Sewing Techniques
Sewing Basics ~ Hand-Sewn Stitches ~ Terminology & Techniques
FREE SEWING GUIDE ~ No3. Sewing Techniques
This guide is the third in a series on sewing, tailored primarily for beginners and hobbyists eager to expand their knowledge of textiles and sewing techniques.
Learn to Sew | Hand Sewing Basics | Beginners Guide
Practice makes perfect as the saying goes, If you have ever learned to drive, or play a musical instrument you will know that just because you have watched a video, read a tutorial, received some instruction and had a go, doesn’t mean you can then drive the car, play the instrument etc…not without a lot more practice anyway.
Sewing like any other skill takes time to learn and you need to practise.
Luckily there are lots of free tutorials and patterns available online, supplies and equipment are easily available and relatively inexpensive, so it’s not an expensive hobby to start and a useful skill to learn.
Hand Sewing Techniques:
- THREAD A NEEDLE
- USE PINS
- ANCHOR STITCH
- RUNNING STITCH
- BASTING/TACKING STITCH + TRANSFER PATTERN MARKINGS
- BACK STITCH
- WHIP STITCH
- LADDER STITCH
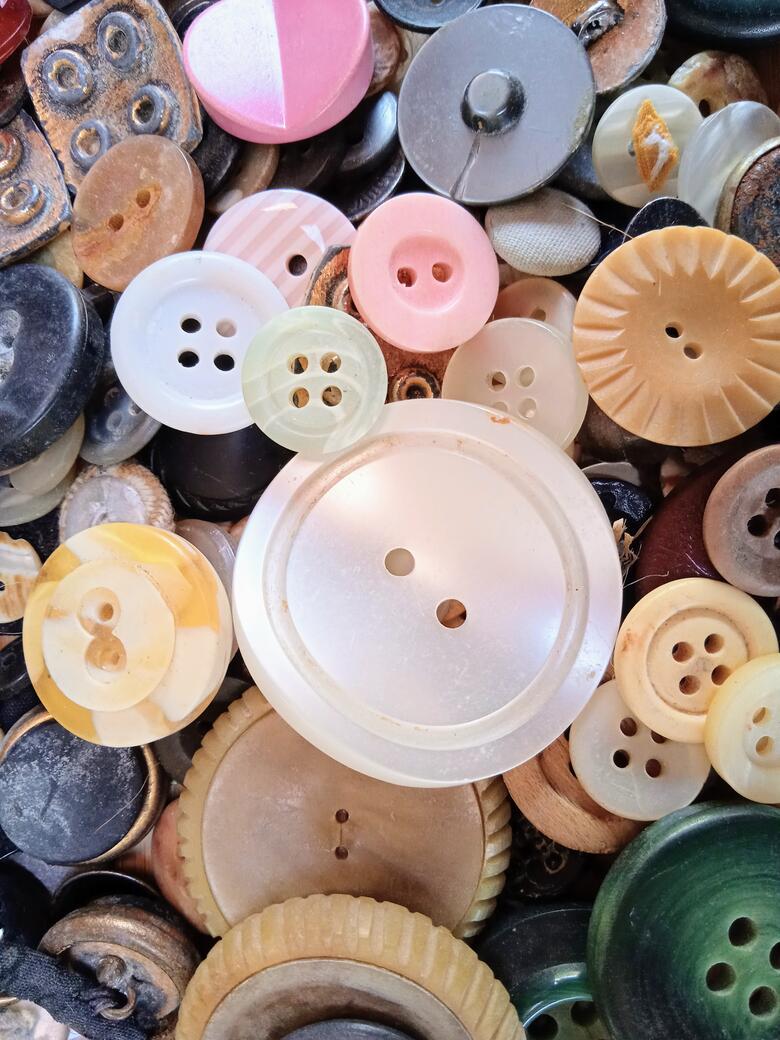
- SEWING ON A BUTTON
- APPLIQUE
- QUILTING
Coming Soon: Book of Stitches: Learn-to-Sew Course for beginners
THREAD A NEEDLE:
In sewing stitches are used to secure two pieces of fabric together (…or for decoration). If you look on the inside of any garment that is sewn together e.g. a pair of jeans or a shirt, you will see the stitches that hold the fabrics together. These stitches are made using a sewing needle and thread.
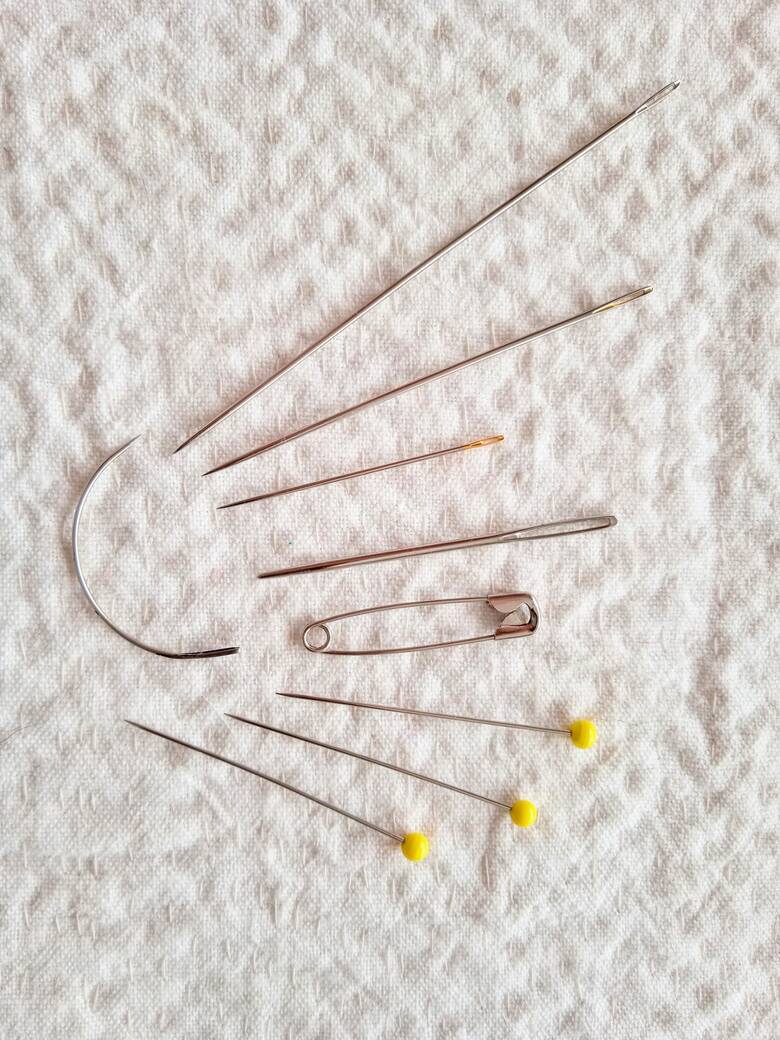
A sewing needle is a short, fine metal shaft. One end is blunt and has an opening in it (the eye of the needle), the other end has a sharp point.
The stitches are formed when the thread is carried through the two layers of fabric, in the eye of the needle.
HOW TO THREAD A NEEDLE:
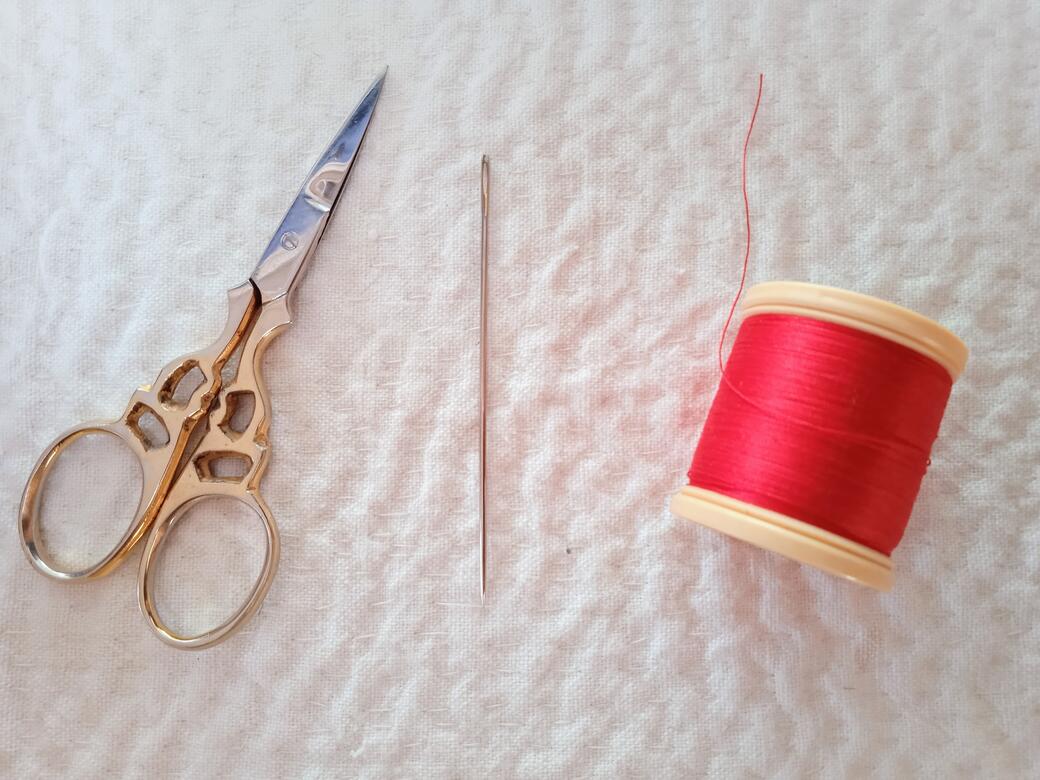
1. Cut a length of sewing thread approx. 50 cm long using sharp scissors. Fig [a]
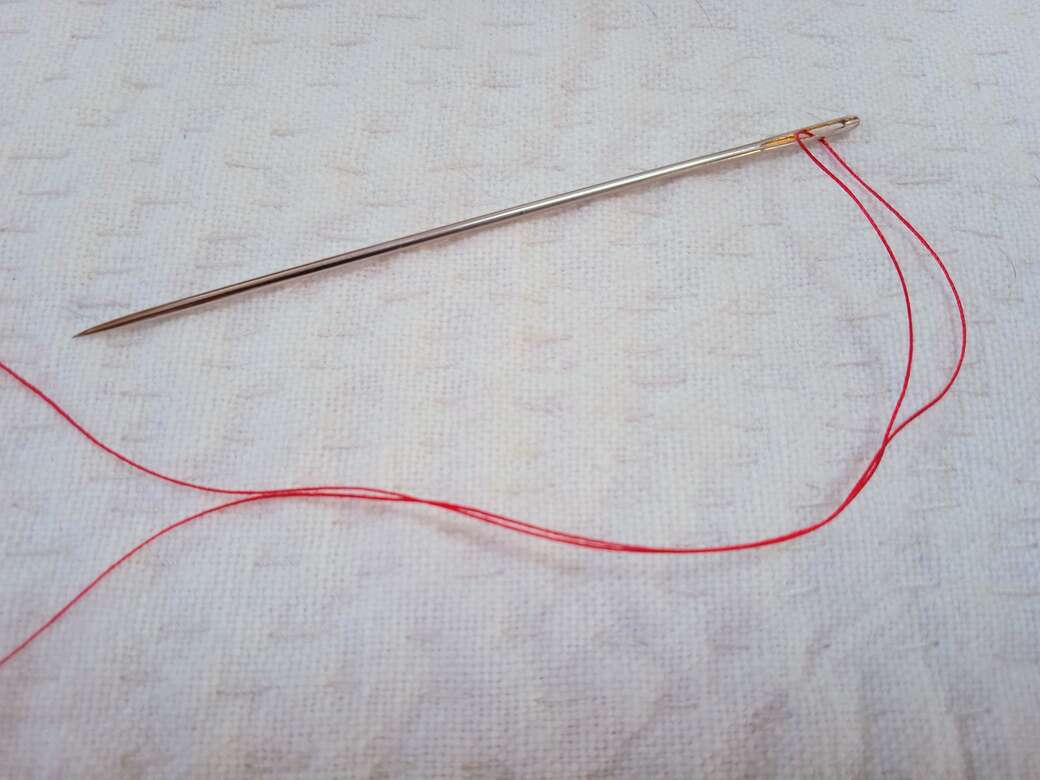
2. Holding the needle in one hand at the pointed end, pass the cut end of the thread through the eye of the needle. I am right handed and find it easiest to hold the needle in my left hand and the thread in my right hand. Using the newly cut end of thread makes it easier to pass through the eye because it is a nice neat blunt cut with no frayed fibres. Fig [b]
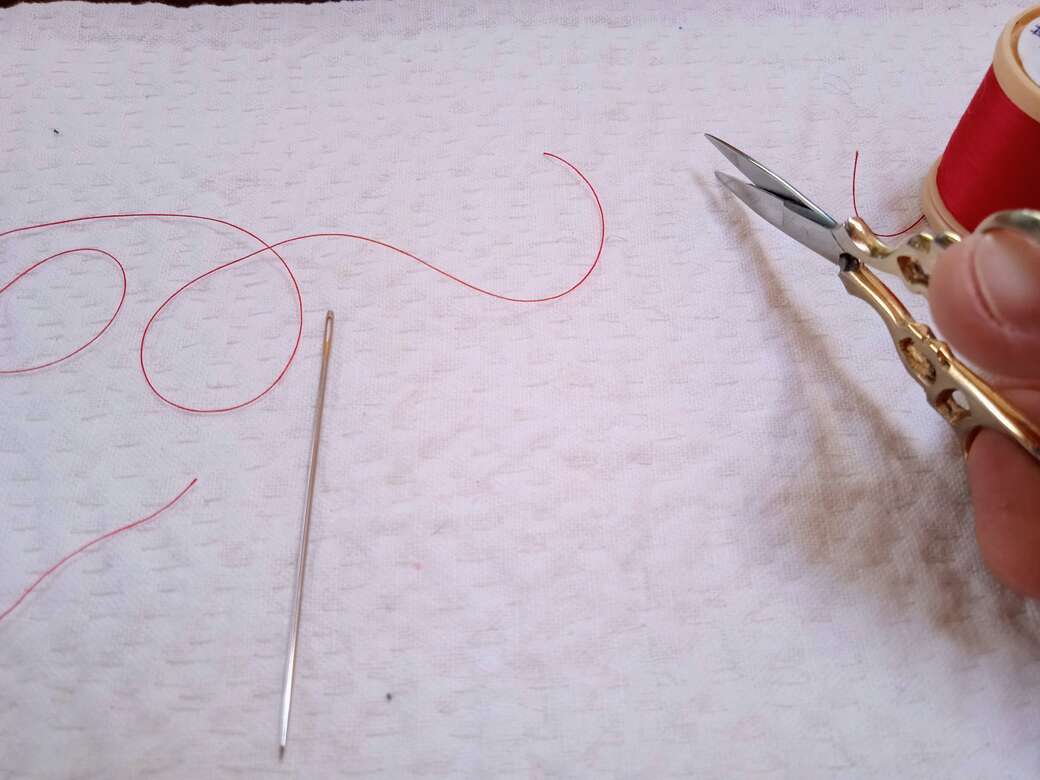
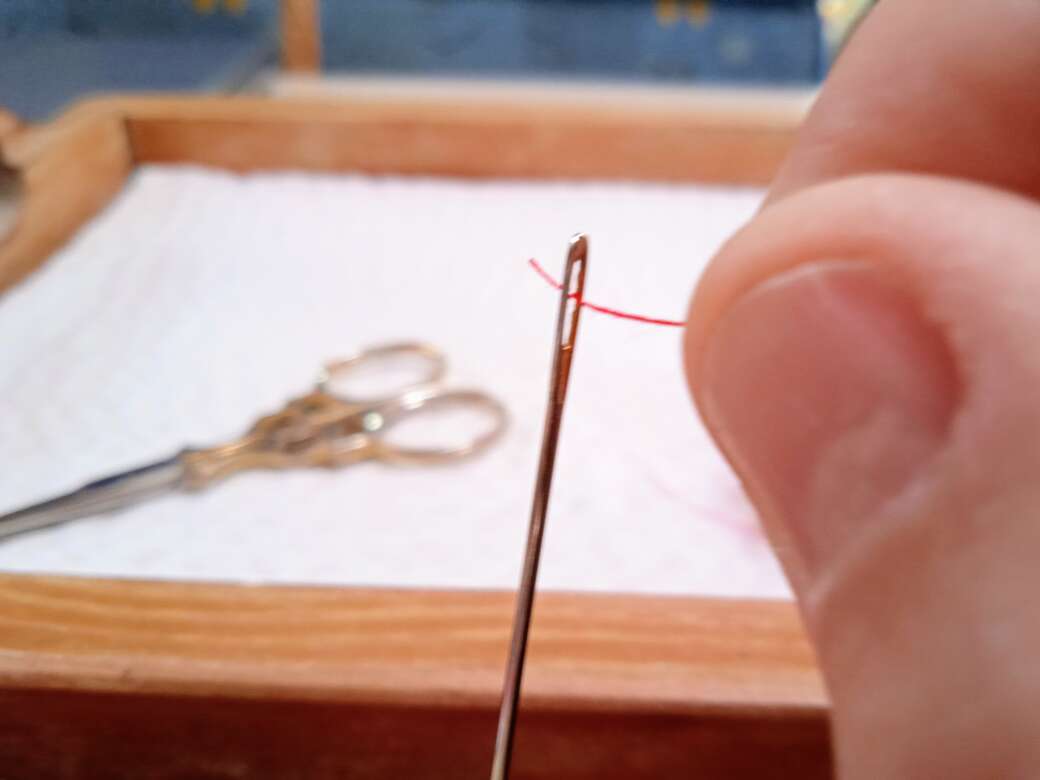
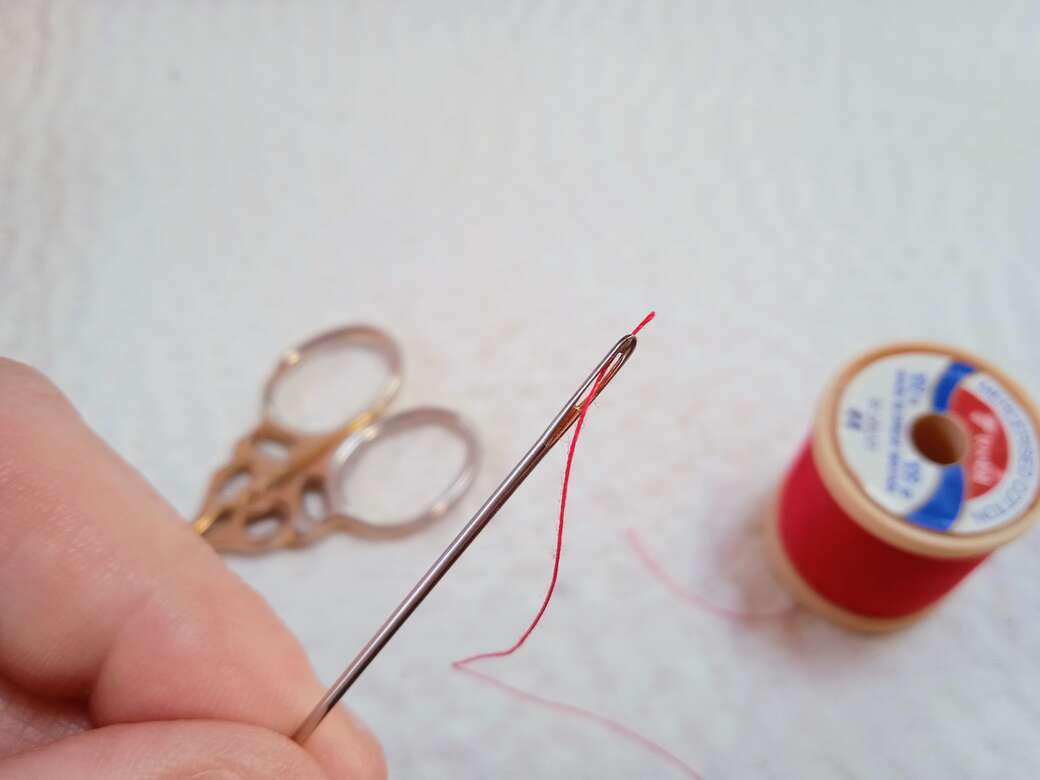
3. Carefully pull the end of the thread on the other side of the eye until approx. 15-20 cm of thread has passed through the eye of the needle. Fig [c]
4. The thread should hang down either side of the eye of the needle. One side of the thread should be longer (30-35 cm). This longer thread is used to sew the stitches. The shorter side (15-20 cm) is to help prevent the needle unthreading whilst sewing. Fig. [d]
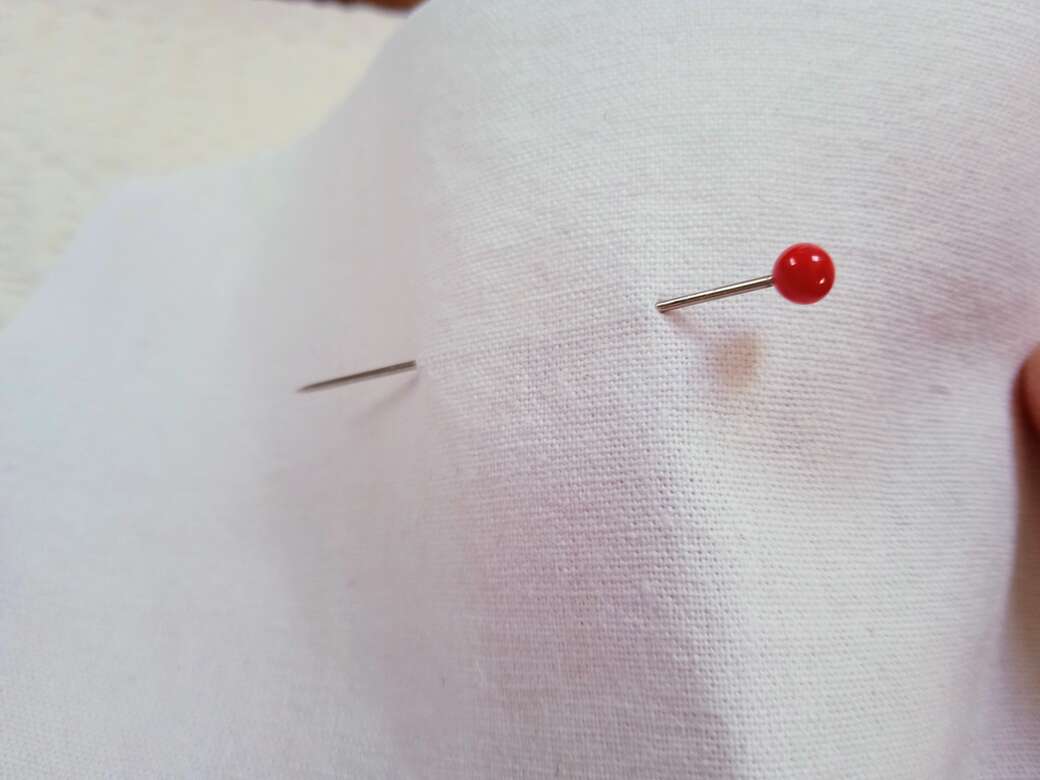
USE PINS:
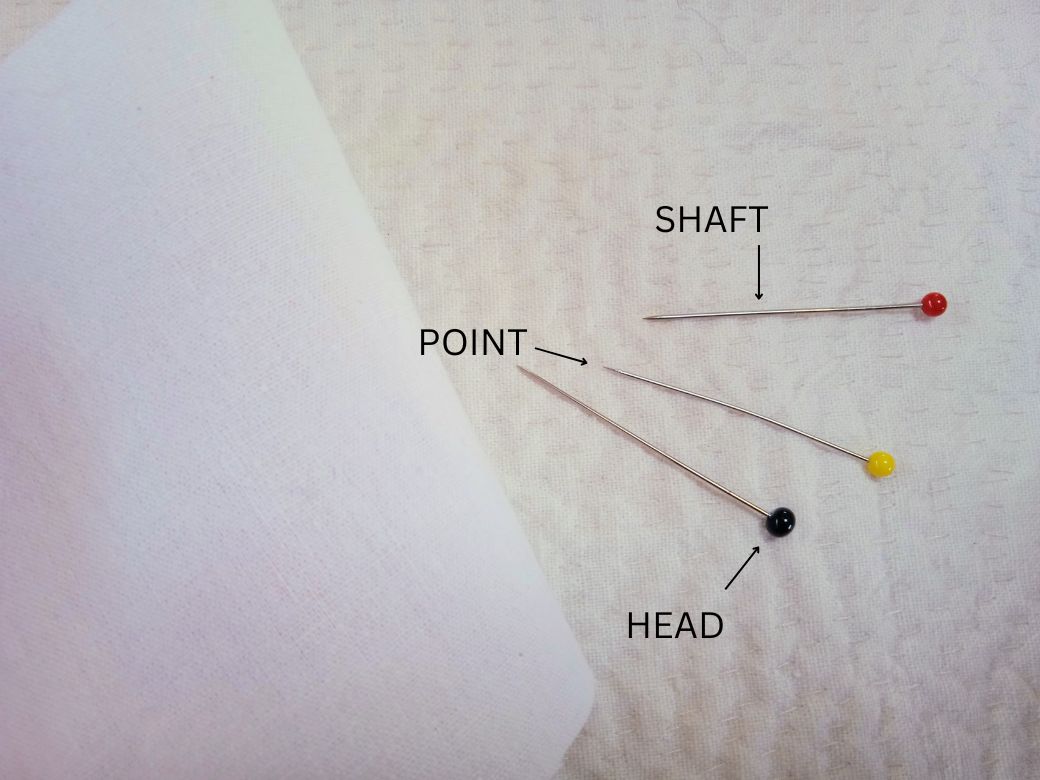
Dressmaking or general purpose sewing pins are short, thin, shafts of metal with a fine point at one end and a head at the other. They are used to temporarily hold two pieces of fabric together before stitching and are usually placed a few centimetres apart. Once the two pieces of fabric have been stitched together the pins are removed.
Pins have 3 sections: Fig [e]
i) The Head – A glass or plastic ball though sometimes a small flat metal disc. The head of the pin acts as a stopper to prevent the pin passing through the fabric.
ii) The Shaft – The main section of the pin that holds the two pieces of fabric together like a large metal stitch.
iii) The Point – The point allows the pin to pass easily through the layers of fabric.
HOW TO USE PINS:
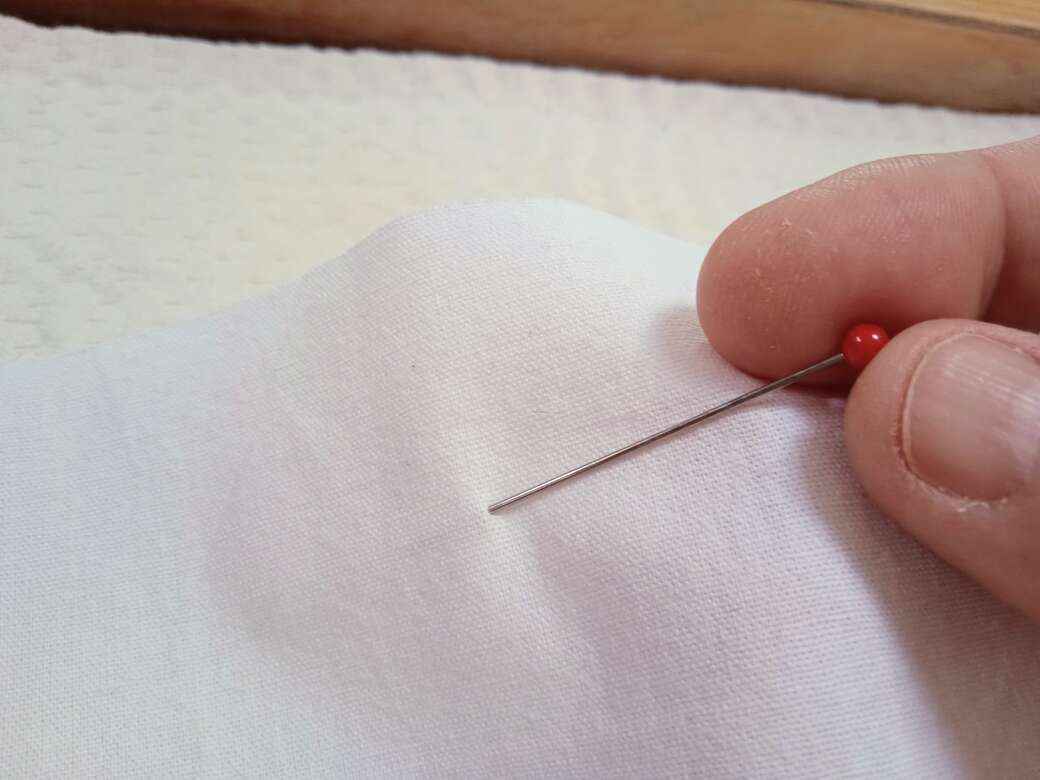
1. Hold the head of the pin between your thumb and index finger. Push the point through the surface of the fabric so the pointed end of the pin comes out at the underside of the fabric. Push the pin far enough into the fabric so only the top half of the pin is visible on the surface. Fig [f]
2. Push the point back up through the fabric from the underside and up to the surface. The point should come out of the fabric about 2 cm away from where the pin goes into the fabric. Fig [g]
3. The pin should be divided into 3, roughly equal, sections:
i) The head (brightly coloured bead) and upper shaft on the upper surface of the fabric. Fig [g]
ii) The middle of the pin shaft only visible on the underside of the fabric, resembles a large metal stitch. Fig [h]
iii) The pointed end of the pin shaft on the upper surface of the fabric. Fig [g]
PREPARE PRACTICE FABRICS: Taken from 'The Book of Stitches: Learn-to-Sew Course for beginners'
For the purpose of practising the stitches included in this guide, I am using pieces of practice fabric cut from an old, plain, cotton sheet that has been washed, dried and then ironed to remove most of the creases. Medium weight, woven cotton sheeting is a good material for beginners to practise with because it’s not too flimsy and not too thick. Using a plain fabric makes it easier to see your work, especially if you choose a contrasting thread.
I will be using two different sizes of practice fabric, depending on the type of stitch or technique.
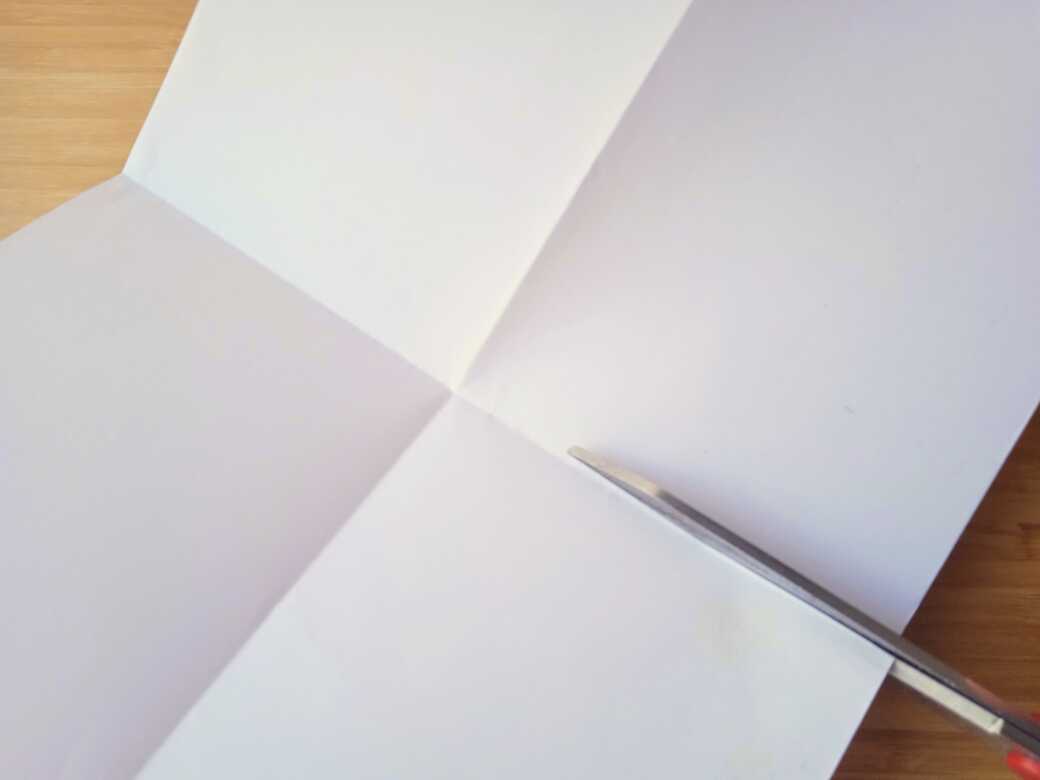
FABRIC SIZE: A – A6 or W105mm x H148mm
While this may sound exact, it is simply an A4 sheet of printer paper folded into four equal parts, then cut along the fold lines to make 4 identical pattern pieces. Fig [P1] This first size is used for practising stitches and techniques on a single flat layer of fabric. (e.g. anchor stitch, running stitch, applique.) Fig [P2]
FABRIC SIZE: B – W165mm x H148mm
Fabric size B is the same height as A but is an extra 60mm wider. Fig [P3] This second size is for practising techniques used with seams, where some seam allowance is needed. (e.g. whip stitch and ladder stitch.)
NOTE: While it’s not essential to use these measurements of fabric (you can just as easily practice on a small off cut of fabric) these instructions are taken from my ‘Book of Stitches: Learn-to-Sew course for beginners’ which is currently being drafted and due to be released in three parts over the summer 2025.
If all of your practice pieces use the same sizes recommended in this guide, they can then be incorporated into the Book of Stitches.
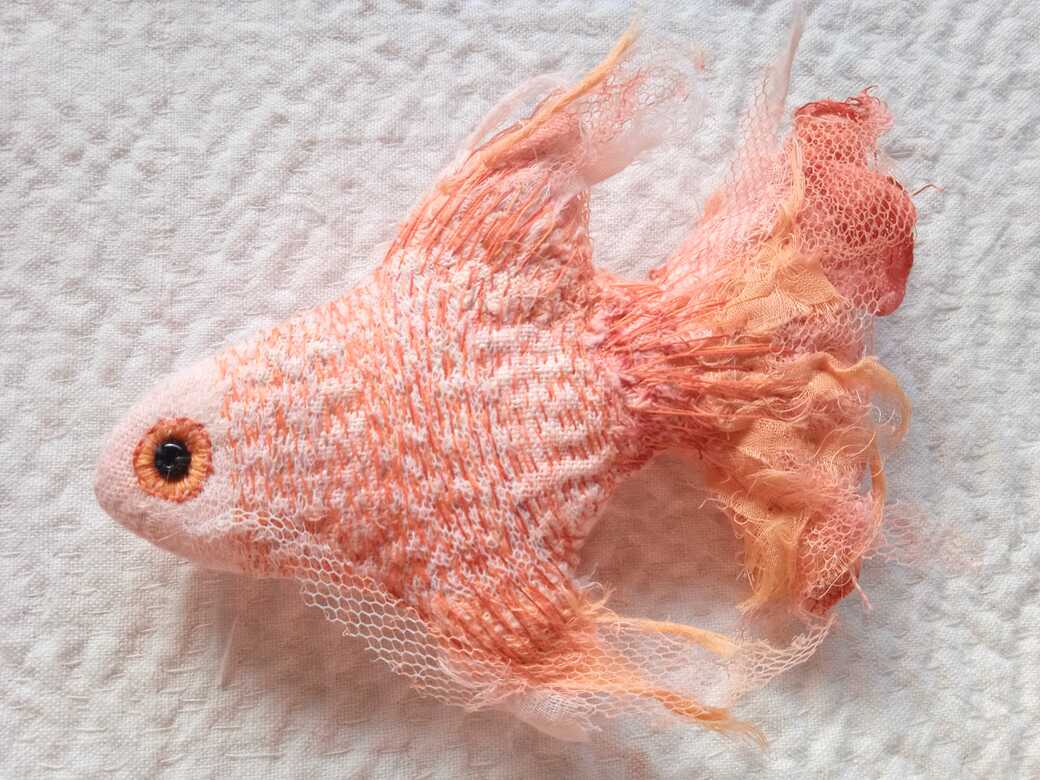
The Book of Stitches is a really cute fabric book that keeps all of your sewing practice in one place. The Learn-to-Sew course that accompanies the making of the book is a fantastic place for beginners to start and includes lots of practice with step-by-step guides and detailed photos.
The finished book is a lovely hand-made piece in itself as well as being a handy reference resource. Fig [P4]
NOTE: *(If you would like to make your practice pieces into the book later, please play special attention to which size of fabric to use for each technique before starting.)

ANCHOR STITCH:
Anchor stitch is used at the beginning and end of sewing to secure the end of the thread without the need for knots.
PRO-TIP: Having worked in both the fashion and textile industries, generally speaking, we do not use knots to secure thread at the beginning and end of sewing. There are exceptions, notably in embroidery, but for general sewing the anchor stitch is used.
In these instructions I go through how the stitch is made in four steps.
HOW TO SEW ANCHOR STITCH:
Use a scrap of plain fabric, (plain fabric makes it easier to see the stitches) approx. W11cm x H15cm, single layer not double and preferably woven not stretch fabric. Old sheeting or shirts are good fabrics for practising stitches.
*(Book of Stitches: Fabric Size: A)
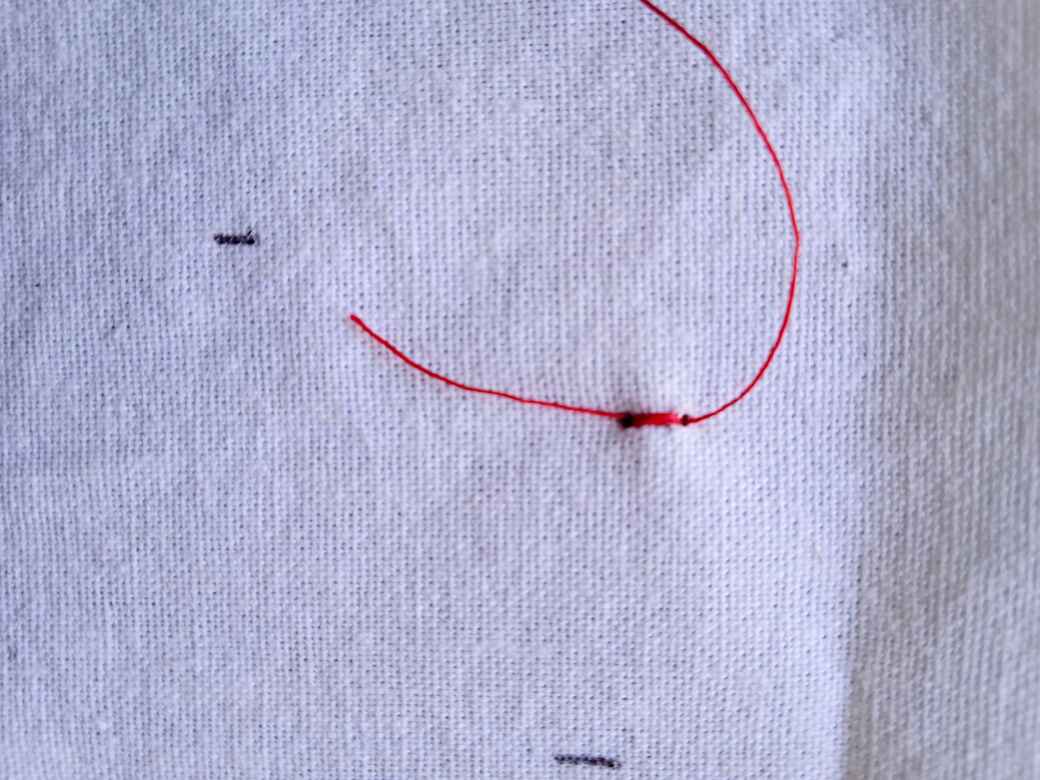
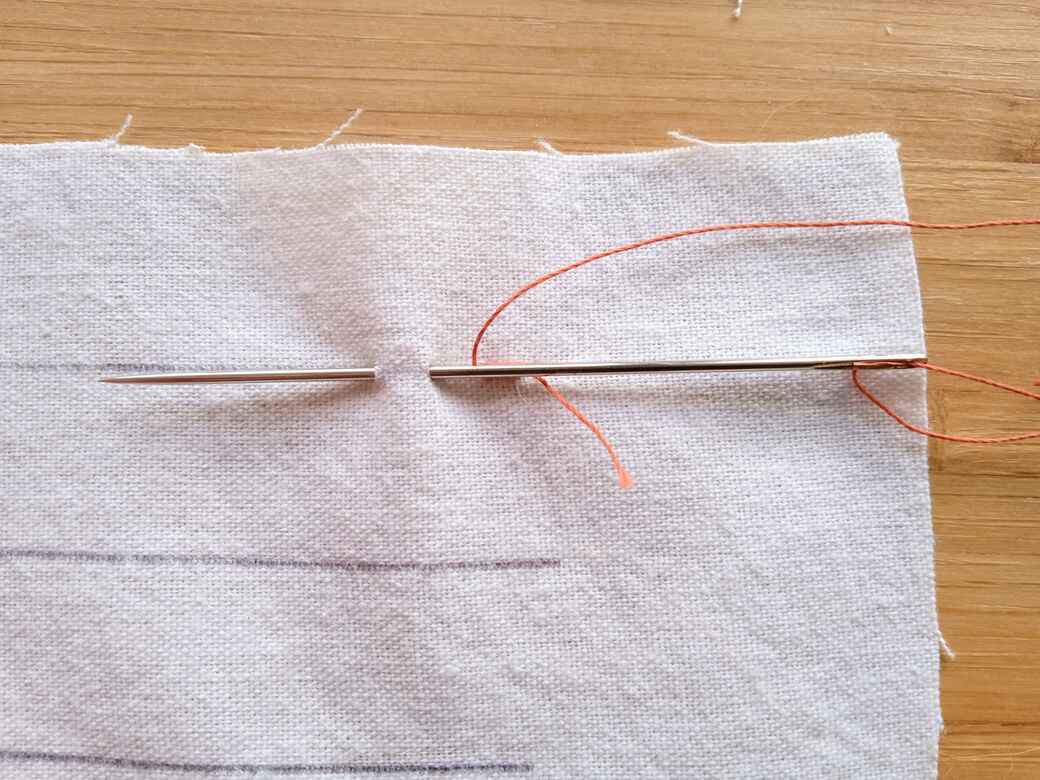
1. Using a biro or pencil draw some small marks, approx. 2mm in length, evenly spaced on the fabric. Here I have kept marks at least 2cm apart. Fig [i] Choose a thread that contrasts with your fabric so you can see your stitches. Cut a length of sewing thread no longer than from your fingers to your shoulder (50-60cm) and thread your needle. (Thread one end of the thread through the eye of the needle, pull the thread so one side hangs down longer than the other. Figs [a-d] Do not tie a knot.
*Push the needle through the fabric at one end of a drawn mark and come back though the fabric, about 2mm from the entry point, at the other end of the drawn mark. Fig [i]
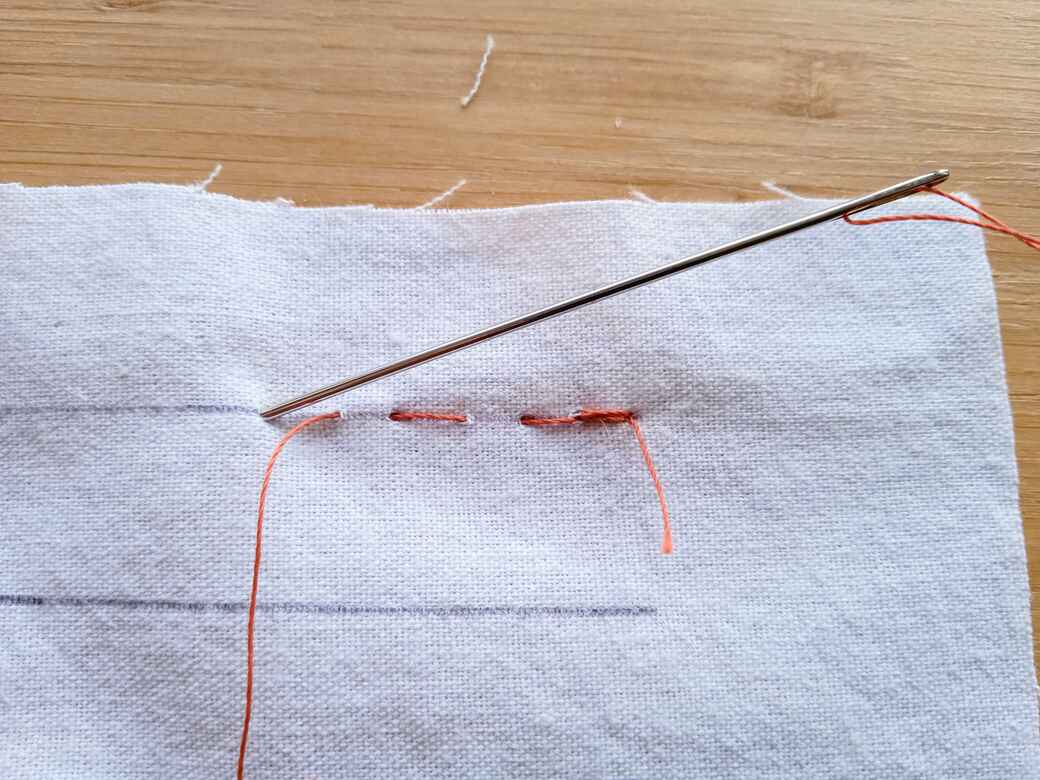
2. Pull the needle and thread through leaving a tail of thread approx. 1-2cms long. **Push the needle back into and out of the fabric in the exact same place as before. Pull the needle and thread through the fabric to form the first stitch. Fig [j]**
TOP-TIP: If the thread tail pulls through the fabric with the first stitch, try holding it in place with your thumb of your other hand.
3. Repeat step 2. instructions from **to** 2 more times to form 3 small stitches on top of each other. Fig [k]
This stops the thread from pulling out, It ‘anchors’ the thread to the fabric at that point.
4. For the purpose of practising the anchor stitch, cut the thread leaving a 1-2cm tail.* Fig [l]
Repeat steps 1-4 from *to* at another mark on the fabric. Repeat until you have formed the anchor stitch at each of the marks on the fabric.
NOTES:
- Anchor stitch is used at the beginning and end of a row of stitching so they don’t usually come loose. These practise stitches are worked individually so may become loose, if so try pulling gently on both tails to tighten.
- With practise you can reduce the size of your anchor stitch to 1 mm
USING ANCHOR STITCH AT THE BEGINNING AND END OF SEWING:
I) Work step 1 from *, step 2 and step 3 to secure the thread at the beginning of your work.
II) Continue sewing in your chosen stitch. (running, back etc.)
III) Work step 2 from **, step 3 and step 4 to secure the thread at the end of sewing and cut the thread when finished.
RUNNING STITCH:
Running stitch is a good basic stitch used to join two pieces of fabric together, either temporarily or permanently, or to create a decorative surface. It’s my favourite hand sewn stitch and you will see it used as a decorative feature in many of my designs. It’s a versatile stitch and also a really simple stitch to master for beginners.
NOTE: ‘Basting’ and ‘Tacking’ When you see the terms ‘basting or ‘tacking’ in hand sewing they refer to temporary stitches holding a piece of fabric in place until a more permanent stitch can be applied. Basting and tacking stitches are long and loose running stitches that can be easily removed when no longer needed. They are useful in many applications including: applique, gathers and transferring pattern markings onto fabric. MORE DETAILS LATER IN THIS GUIDE.

HOW TO SEW RUNNING STITCH:
Use a scrap of plain fabric, (plain fabric makes it easier to see the stitches) approx. W11cm x H15cm, single layer not double and preferably woven not stretch fabric. Old sheeting or shirts are good fabrics for practising stitches.
*(Book of Stitches: Fabric Size: A)
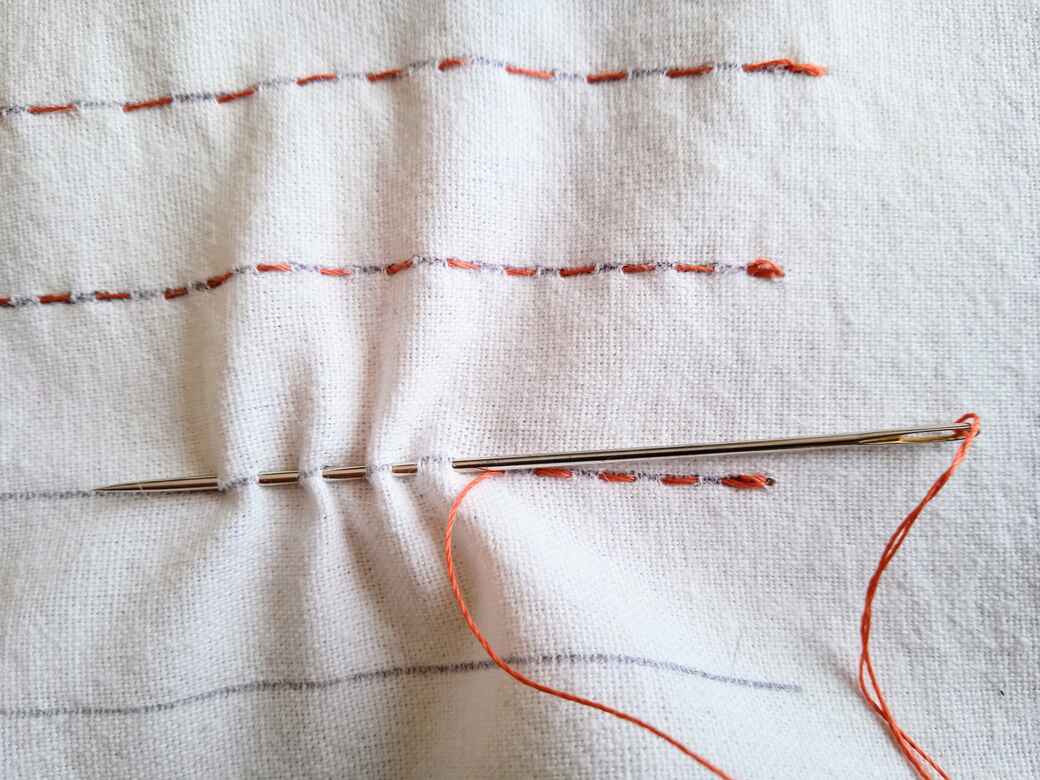
1. Take one piece of practice fabric and using a biro or pencil and ruler draw a series of lines approximately 10 cm long down the length of the fabric. Keep the lines evenly spaced on the fabric and at least 2cm apart. Fig [m] Choose a thread that contrasts with your fabric so you can see your stitches. Cut a length of sewing thread no longer than from your fingers to your shoulder (50-60cm) and thread your needle. Do not tie a knot.
2. Starting at one end of the first drawn line, anchor stitch the thread in place. DO NOT CUT THE THREAD. Fig [n]
3. Push the point of the needle down into the fabric about 3 mm away from the anchor stitch along the drawn line, then push the point of the needle back up through the fabric another 3mm further along the line Fig [o]. Pull the needle and thread through the fabric so that the stitch sits neatly on the surface of the fabric.
4. Continue pushing the point of the needle down and up through the fabric at 3 mm intervals along the drawn line, pulling the thread gently after each stitch so the thread sits neatly on the surface of the fabric. Fig [p] You are in effect sewing a dashed line by weaving the thread through the fabric.
5. Sew one stitch at a time. Don’t be tempted to take shortcuts by making several stitches at once. Fig [q] Hand sewing is a therapeutic slow process. By being mindful and making one stitch at a time you will have more control over each stitch and achieve a more accurate and neat result. Once you are at the end of the drawn line repeat the anchor stitch to secure the thread and cut the thread leaving a short tail.
6. Have fun practising different lengths of stitch by changing the distance between where the needle goes down and up through the fabric. Use the other drawn lines as a guide and remember to anchor your thread at the beginning and end of each line of sewing.
LADDER STITCH:
Ladder stitch is used for stitching closed seam openings which have been left unstitch to allow for turning or stuffing. Once you have finished with the turning and/or stuffing stage of construction, you close the opening using ladder stitch. Ladder stitch brings the two folded edges together without visible stitches so gives a very professional finish.
HOW TO SEW LADDER STITCH:
Use a scrap of plain fabric, (plain fabric makes it easier to see the stitches) approx. W17cm x H11cm, single layer not double and preferably woven not stretch fabric. Old sheeting or shirts are good fabrics for practising stitches.
*(Book of Stitches: Fabric Size: B)
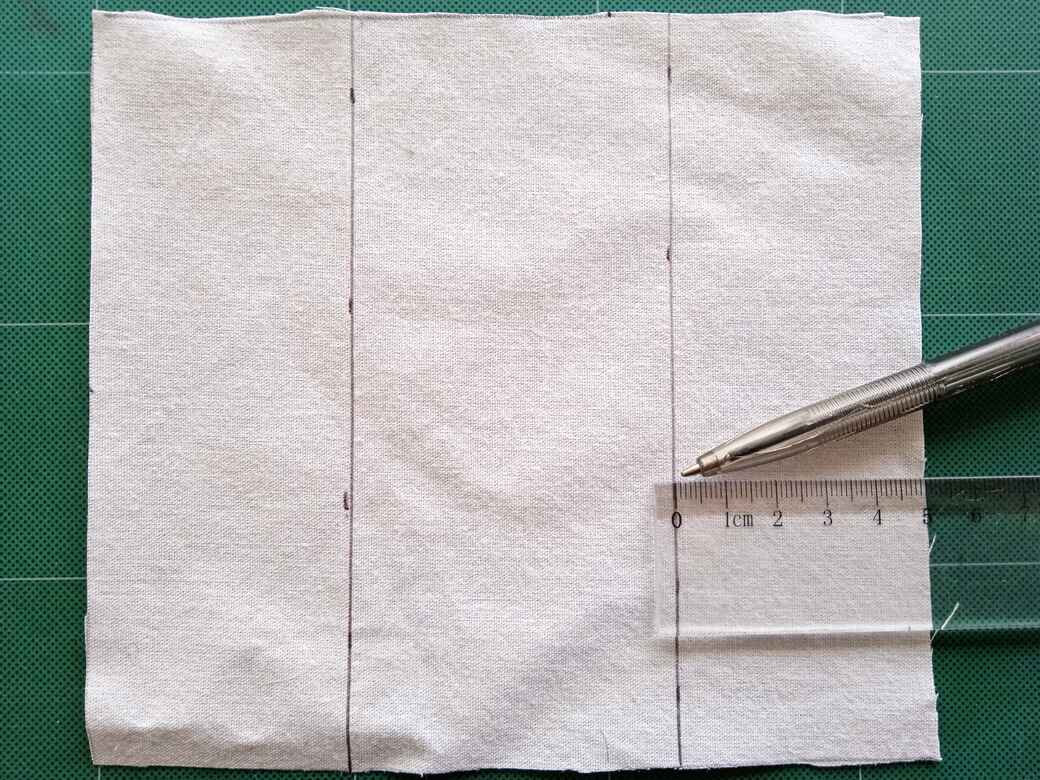
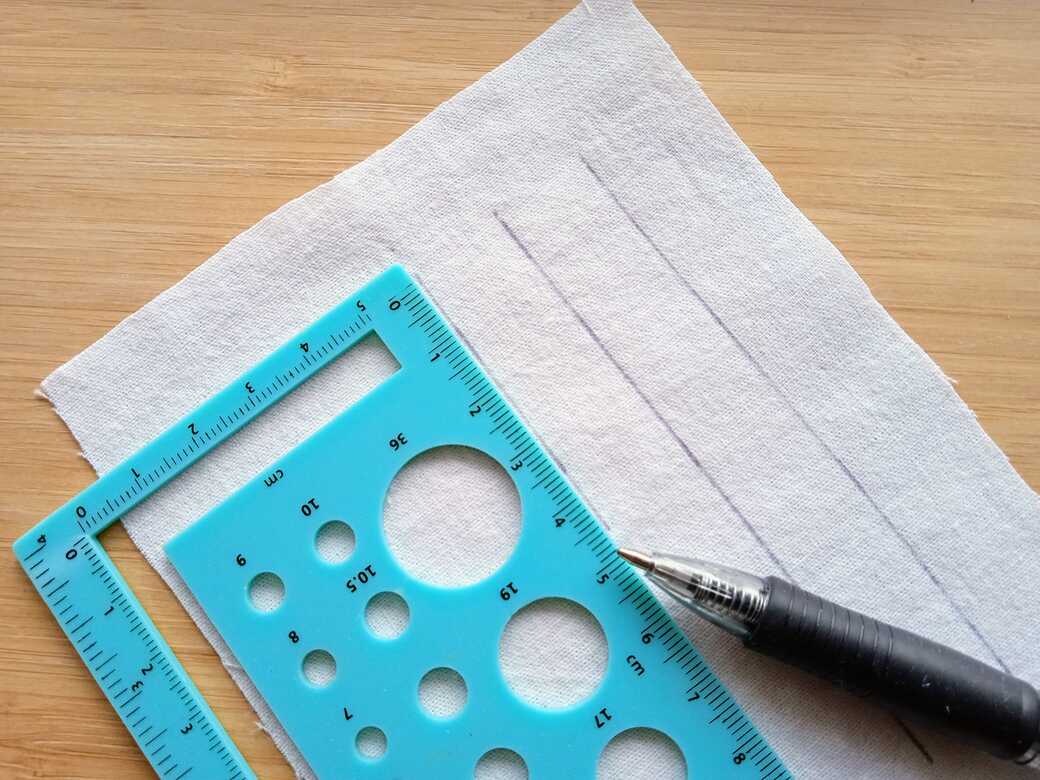
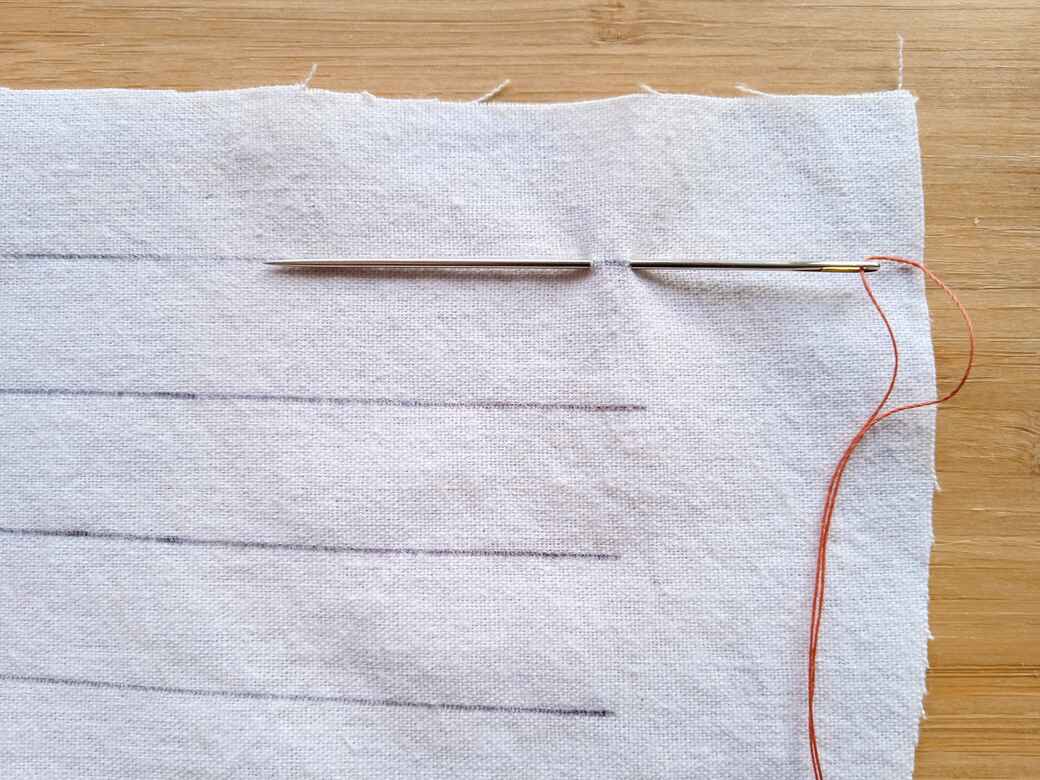
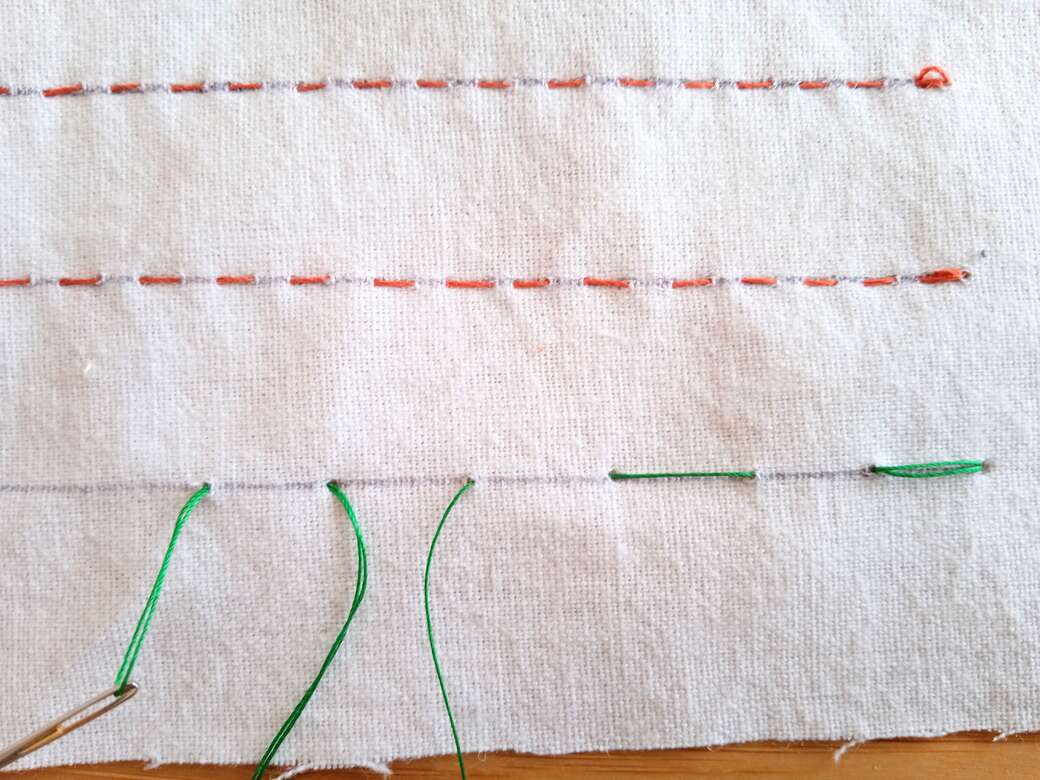
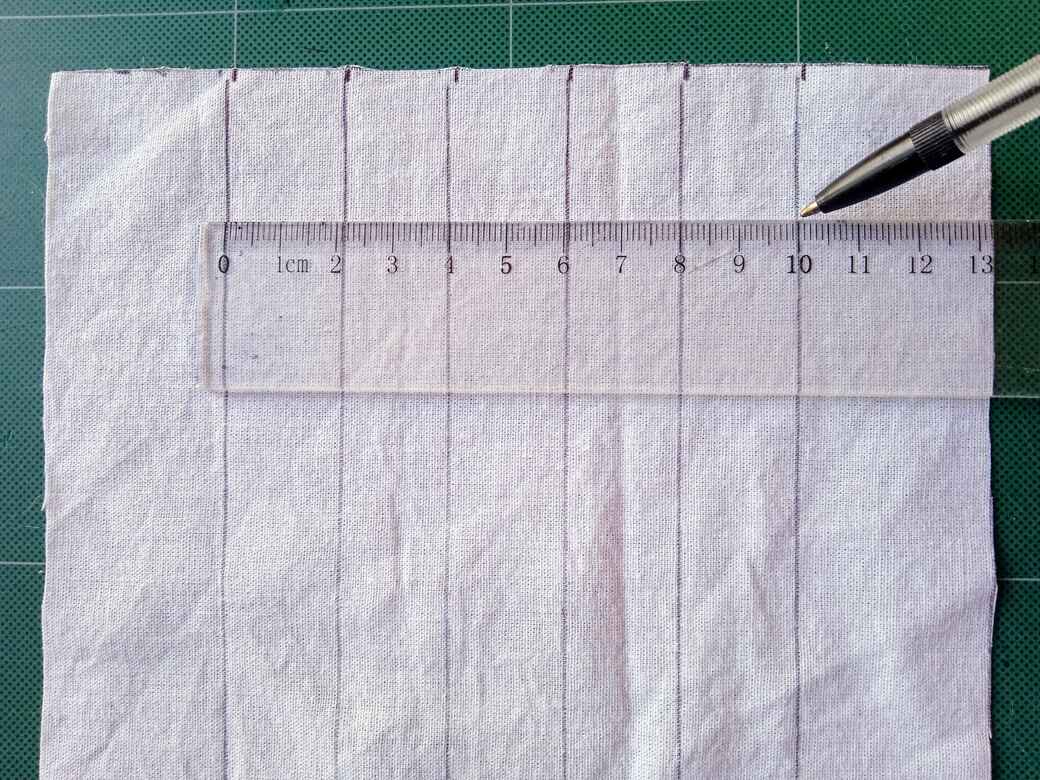
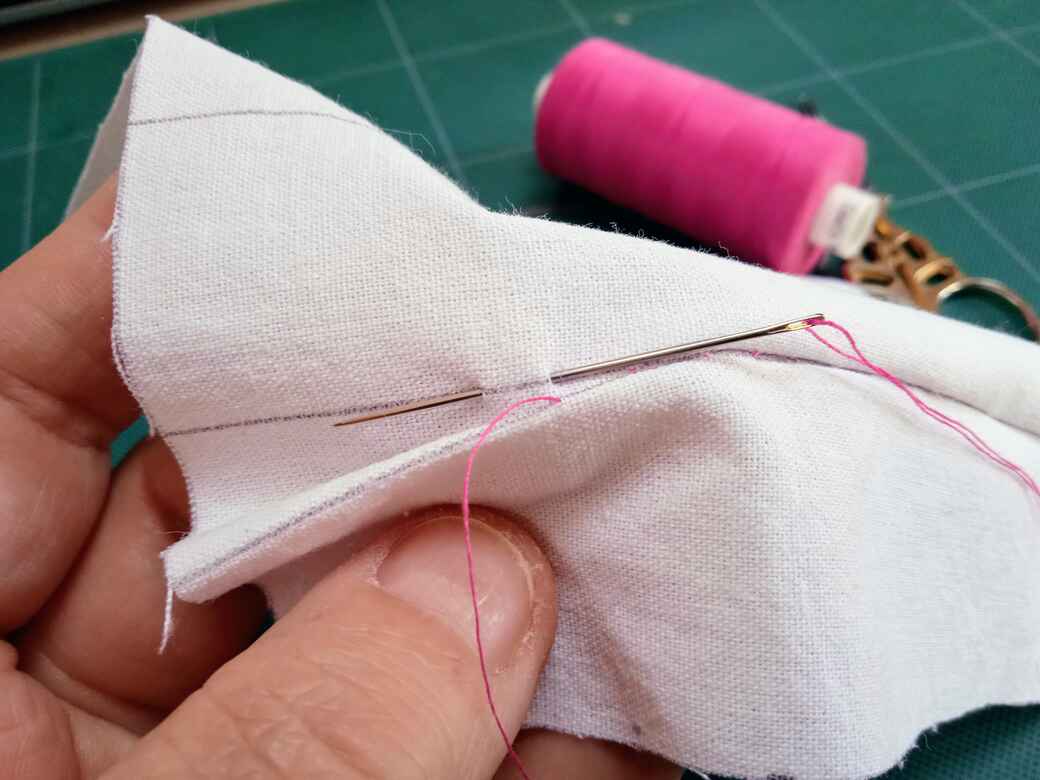
1. Take the piece of practice fabric and using a biro or pencil and ruler, draw 6 vertical lines from the top to bottom of the fabric and approx. 2cm apart. Keep the lines evenly spaced on the fabric and central over the width. (This will leave just over 3cm at the far right and far left either side.) Fig [s] Choose a thread that contrasts with your fabric so you can see your stitches. Cut a length of sewing thread no longer than from your fingers to your shoulder (50-60cm) and thread your needle. Do not tie a knot.
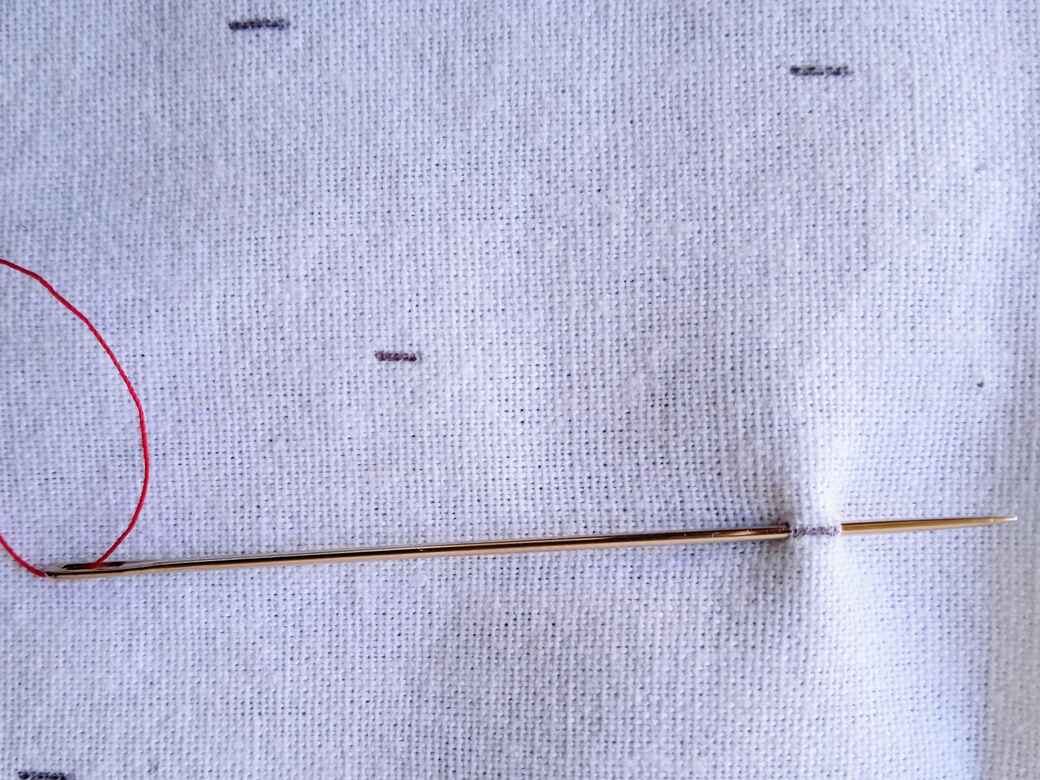
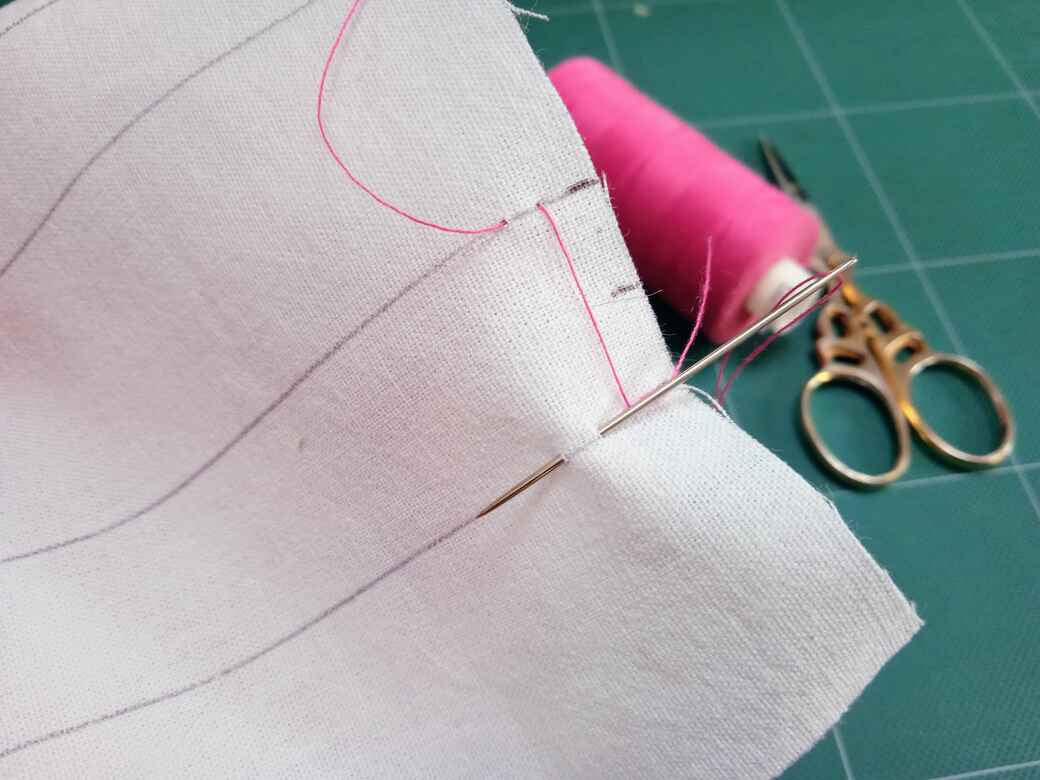
2. Starting at one end of the first drawn line, anchor stitch the thread in place. DO NOT CUT THE THREAD. Fig [t]

3. Make your first stitch, approx. 2mm in length, on the next line. Fig [t]
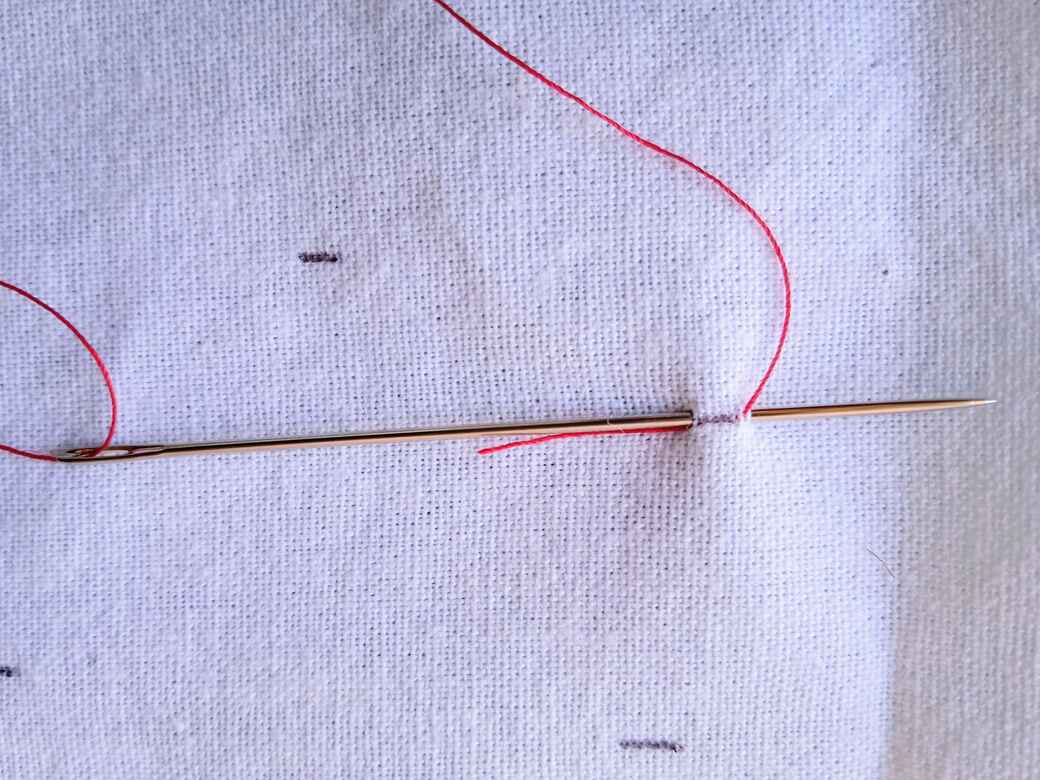
NOTE: Here I am working from right to left so my anchor stitch is on the lowest line and my first stitch on the line immediately above. This creates a long thread between the two lines and is the first rung of the ladder. Fig [u]
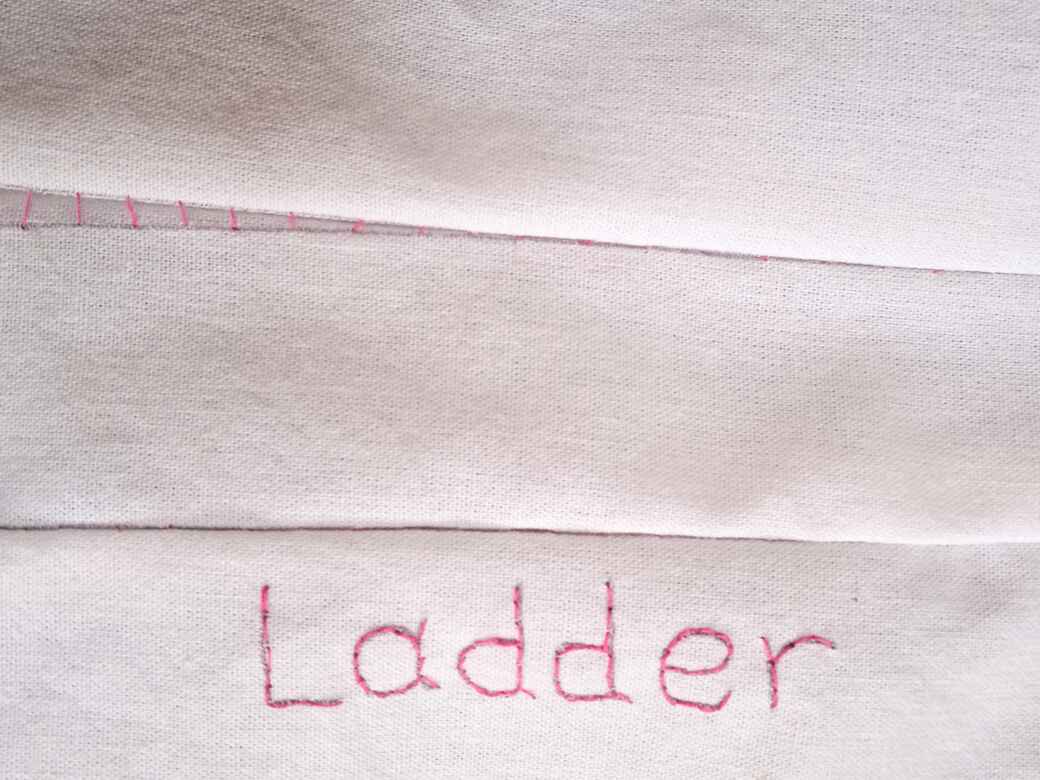
4. Make the second stitch on the same line as the anchor stitch. Fig [u] This creates another long thread between the two lines and forms the second rung of the ladder. Fig [v]

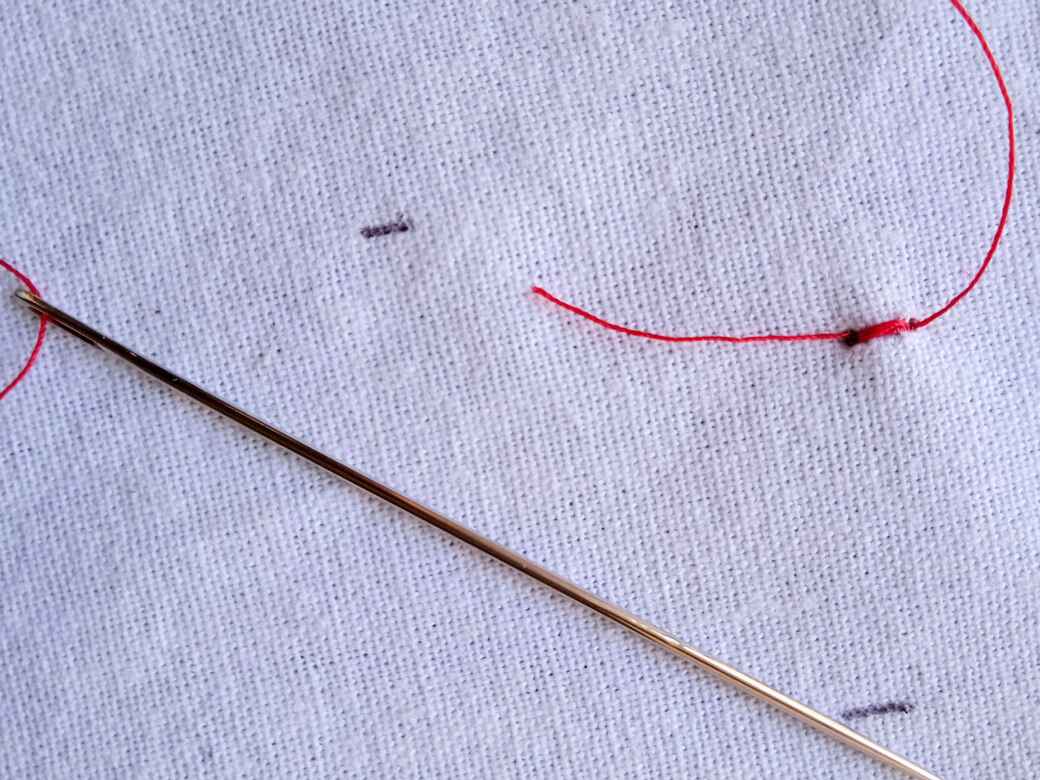
5. Continue to make stitches approx. 2mm long, working from right to left, alternating the stitches between the two lines. This creates the long thread ladder structure between the two lines. Fig [w]
6. Start to tighten the thread, as you work, to bring the stitches together and close the opening. Fig [w] Fig [x]
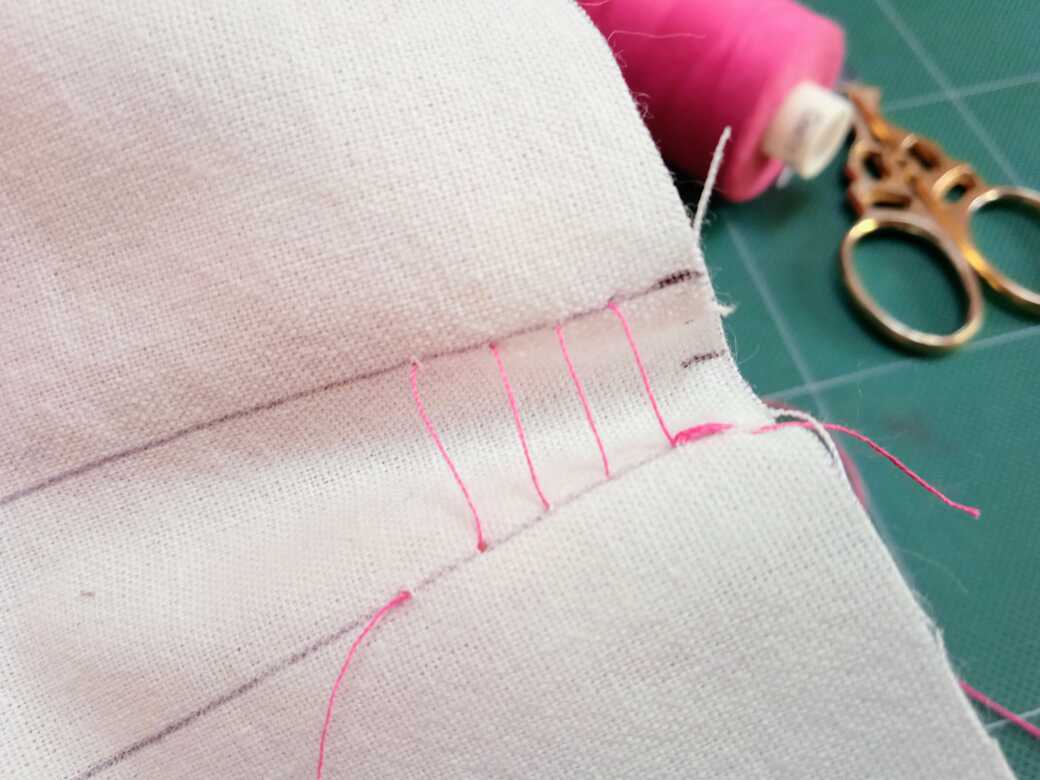
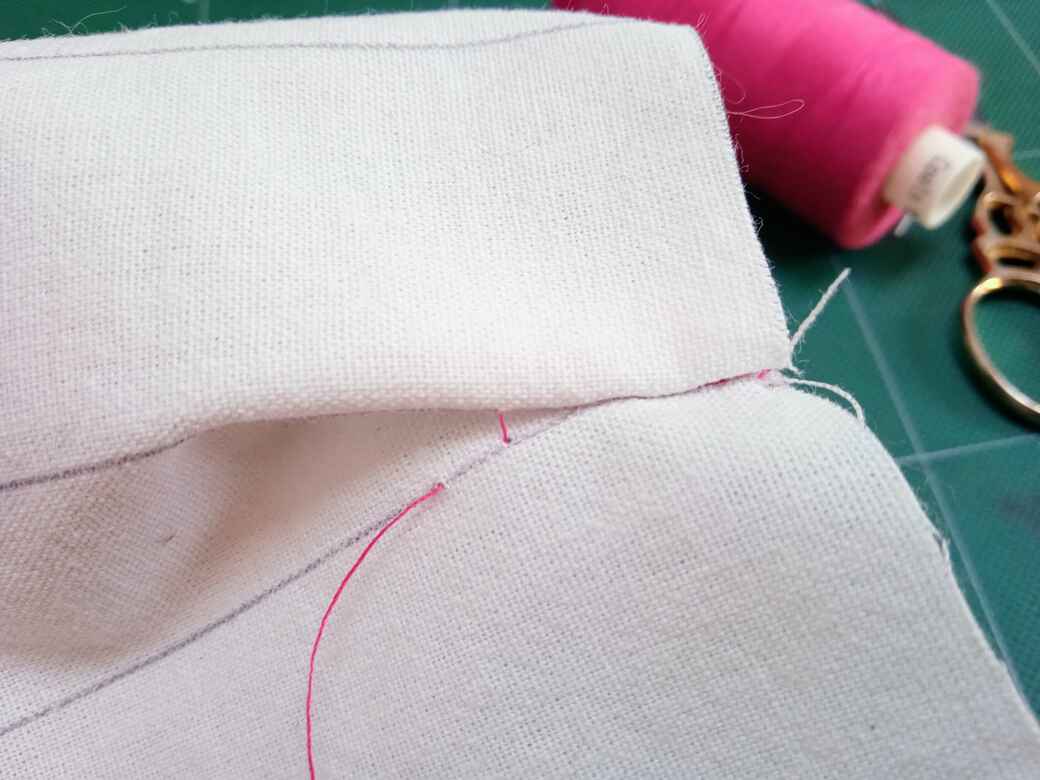
7. Continue to make alternate stitches between the two lines as you work along the length of the opening. Tighten the ladder threads as you work. Fig [y]
8. Once you have stitched the length of the lines and tightened the thread to close the opening, anchor stitch to secure the thread and cut it leaving a short tail. Fig [z]
NEXT TIME ~ SEWING ON A BUTTON
This guide is currently being updated sorry for any inconvenience.
I am uploading each technique one at a time, as soon as it has been drafted and checked.
If the technique you were looking for isn’t available yet please accept my apologies and check back soon.
In the meantime you may be able to find a ‘how to video’ on YouTube by searching the specific technique e.g. ‘Applique’
Check Out My Other Free Sewing Guides
No.1 Basic Sewing Kit
No. 2 Sewing Resources
Doll Making - Pro-Tips
Thank You ~ Happy Sewing x
Where would you like to go next?
Blog
Home Page
Free Patterns