Wall Flowers | Create a Beautiful Display of Everlasting Knitted Flowers for your Home
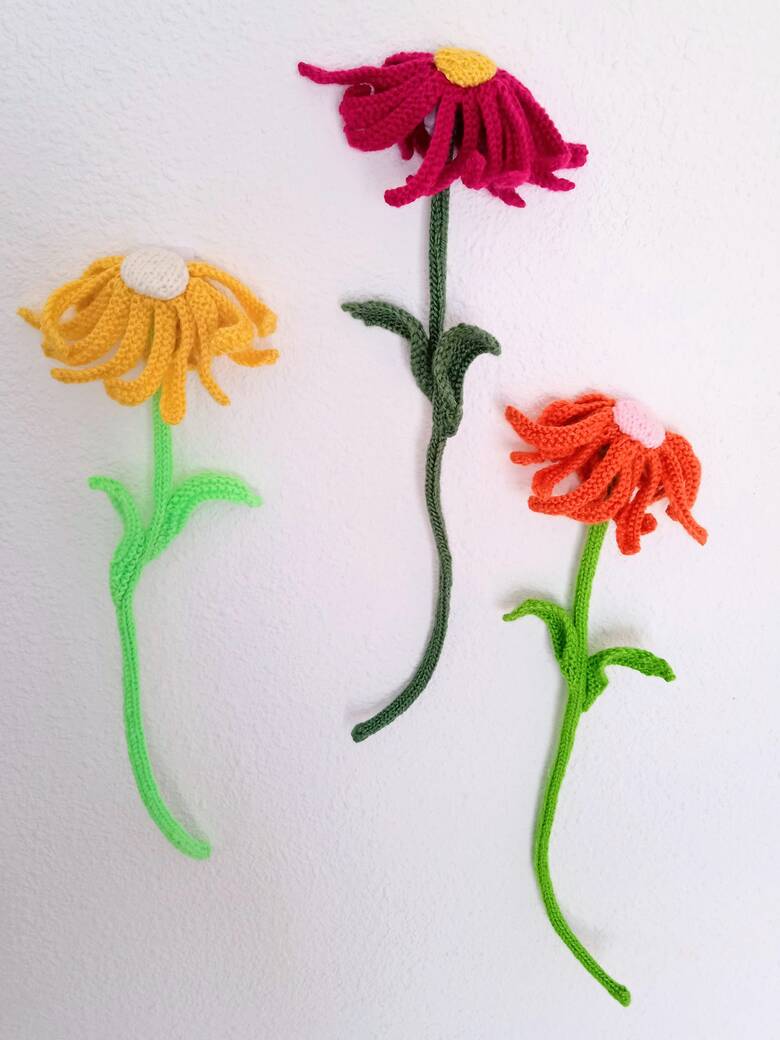
These simple hand knitted flowers make a beautiful addition to any home.
Wall Flowers free knitting pattern and tutorial is a fun and easy-to-follow knitting project, great for the weekend and suitable for beginners that are looking for something a little more challenging. The pattern only uses knit and purl stitches but with some knit-two-together shaping and cast-on and cast-off practice it’s perfect for perfecting those skills.
These pretty knitted flowers are versatile enough to suit many décor styles and can be made using oddments of yarn leftover from other projects so they won’t break the bank.
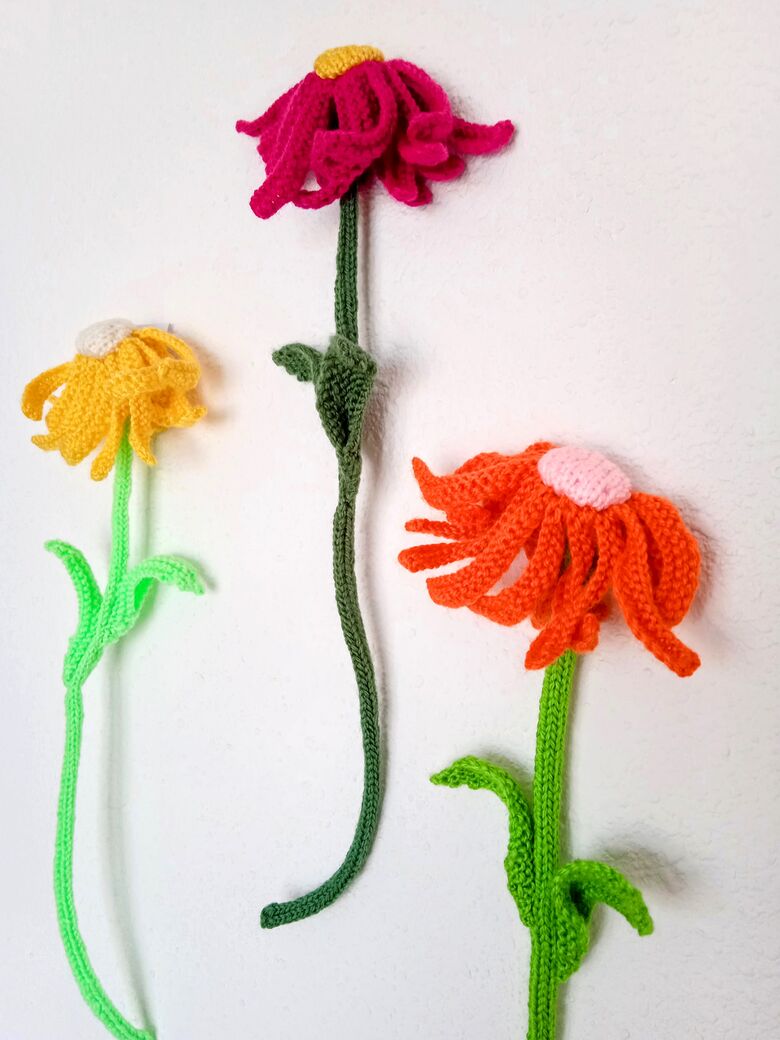
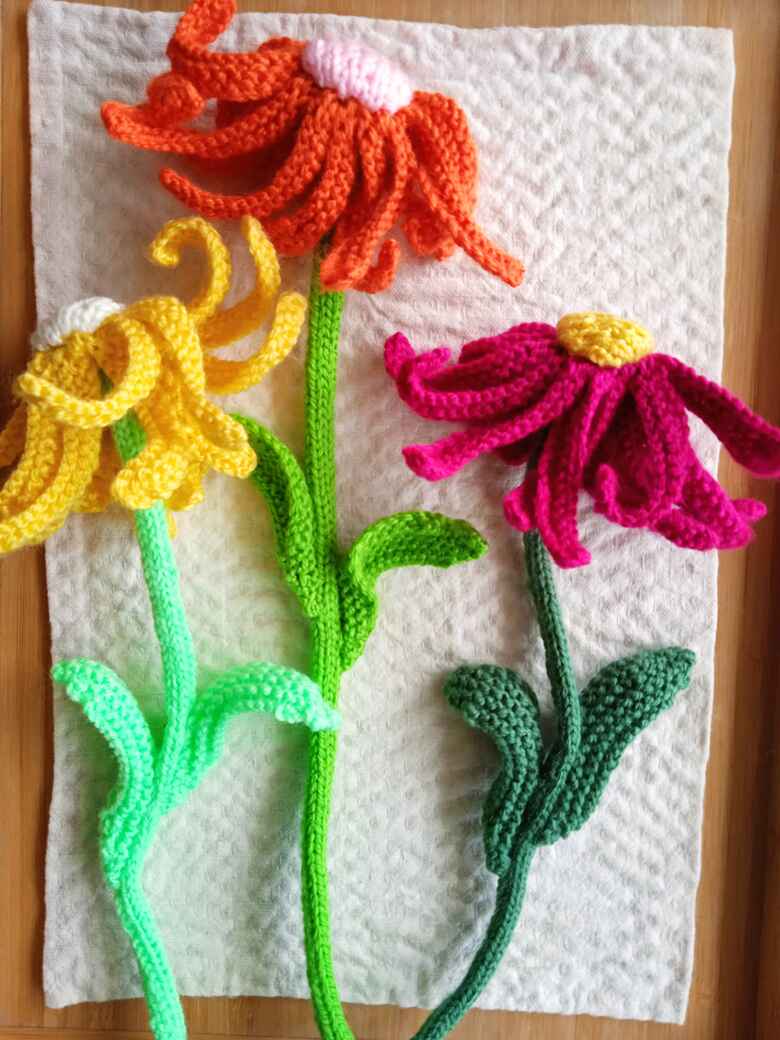
Why not try a minimalistic style of individual, delicate, daisy-style flowers with simple white petals and sunshine yellow centres.
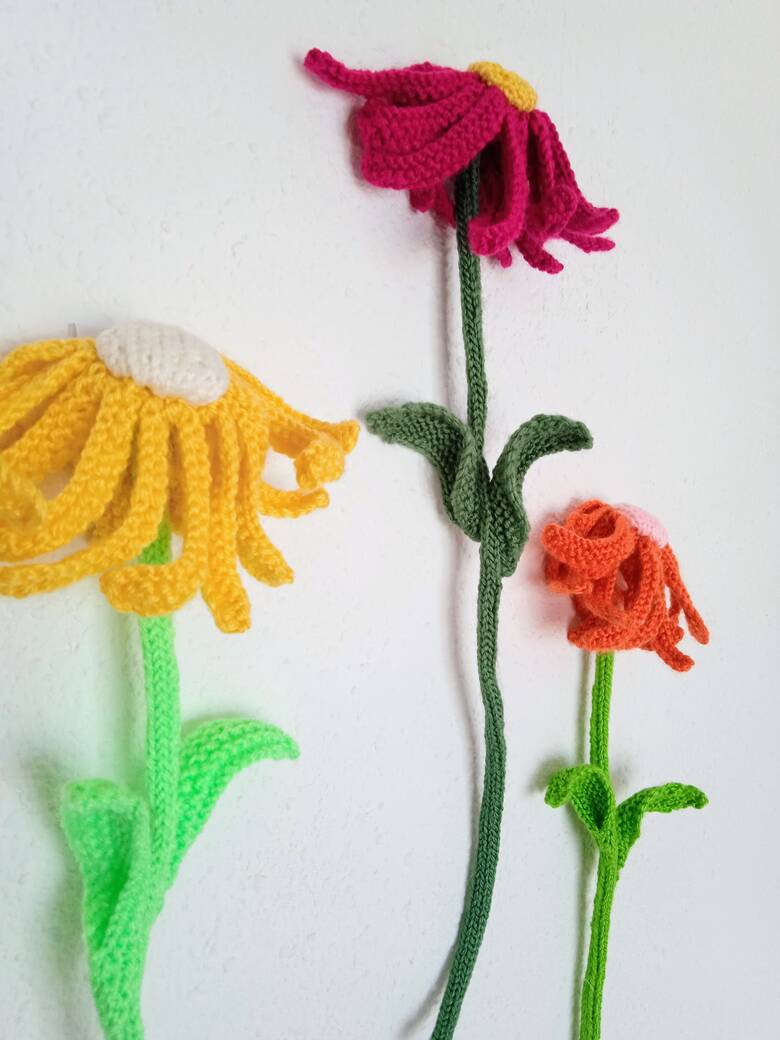
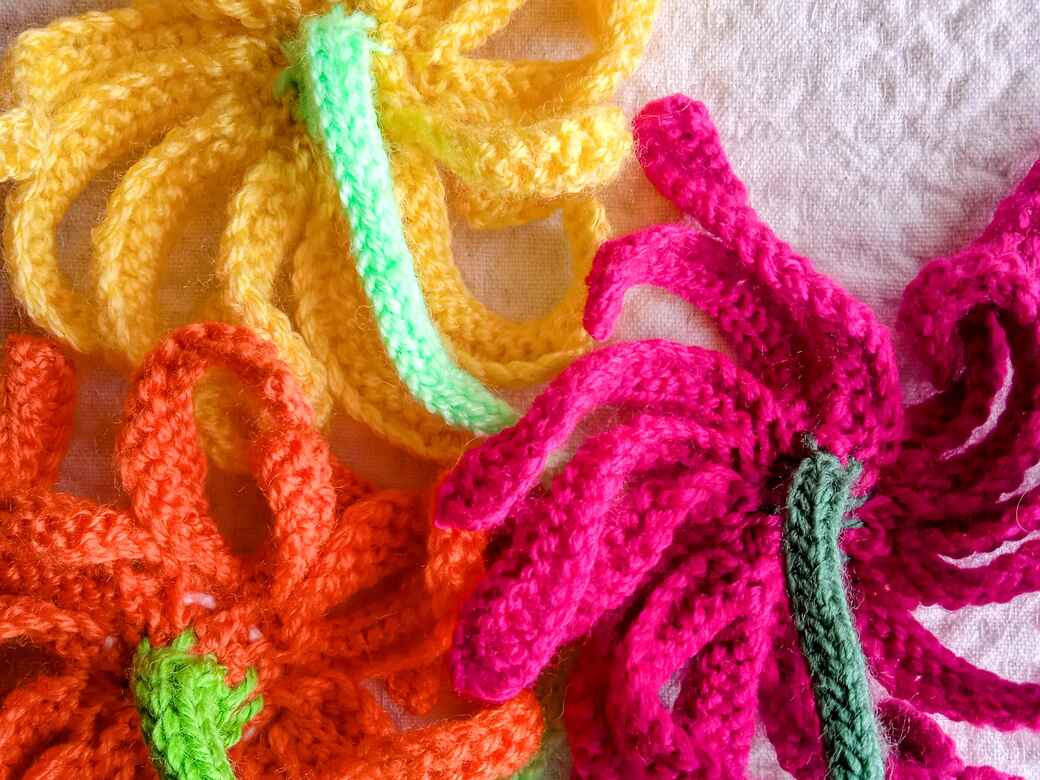
Alternatively give your home the WOW factor with an eye-catching display of colour by creating a feature wall of flowers using every colour in the rainbow.
Whatever your style I hope you have fun making these flowers and enjoy them around your home for many years to come.
WALL FLOWERS | Beautiful Hand Knitted Flowers | Free Knitting Pattern and Tutorial
*Green Dog Dolls is new to Patreon so membership and access are FREE.
Wall Flowers ~ Free Knitting Pattern & Tutorial
© GREEN DOG DOLLS 2025
UK English version
Skill Level – Easy – Medium
YOU WILL NEED:
NEEDLES:
3mm circular knitting needles, 3mm regular knitting needles (OPTIONAL), Knitters sewing needle (Tapestry needle)
YARN:
Double Knit, 3 colours for each flower, small amounts less than 25g of each colour.
I used James C Brett Top value DK.
OTHER:
Tiny amount of polyester stuffing, a few pins.
GAUGE: Not important for this pattern.
ABBREVIATIONS:
K (Knit), P (Purl), Tog (Together), Inc (Increase 1 stitch by knitting into front and back of stitch), st/sts (Stitche/s) PFSOL (Pass first stitch over last stitch. Example: on the right needle you have 2 stitches, pass the right stitch over the left stitch and off the needle so you have 1 stitch remaining like casting off),
RS (Right side of work), RSF (Right side of work facing), CO (Cast on), KW (Knit wise), PW (Purl wise), Stocking Stitch (Knit one row, Purl one row)
Slide (Create i-cord circular knitting by keeping right side of work facing, knit a row as normal then slide all the stitches to opposite end of circular needles, bring yarn from left side around the back of work and start knitting again as normal with right side facing.)
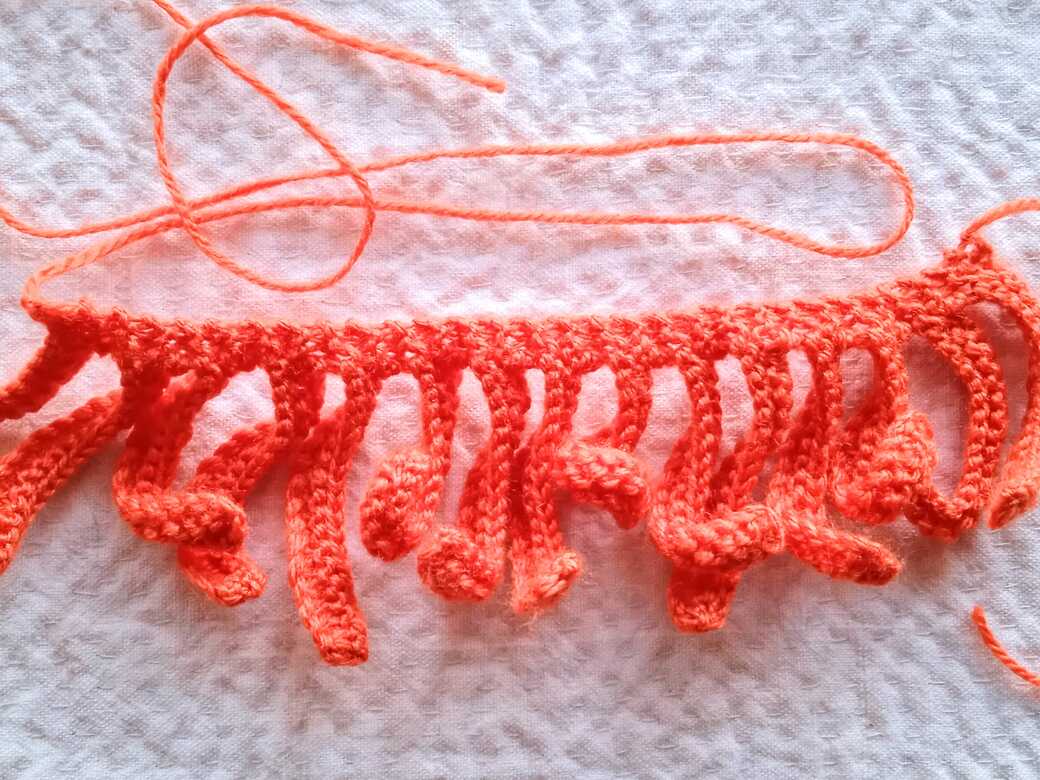
Petals: Make one:
Using main colour yarn and 3mm knitting needles (circular or straight), cast on 20 stitches.
Row 1 *Inc into first 2 sts KW, K to end (22sts)
Row 2 RS, Knit
Row 3 K2Tog, K2Tog, PFSOL, Cast off KW to last 2 sts, K2 (3sts)
Row 4 K3, turn work, CO 17sts (20sts)*
Rows 5-56 Repeat from Row 1 * to Row 4 * 13 times
Row 57 Inc into first 2 sts KW, K to end (22sts)
Row 58 RS, Knit
Row 59 K2Tog, K2Tog, PFSOL, Cast off KW to end, fasten off.
Cut yarn leaving a long tail for gathering up the petals into a round.
Stem: Make one
Using 3mm circular knitting needles and stem colour, cast on 5sts
Row 1 Knit
Create i-cord: RS facing slide all 5sts to the opposite end of the circular needles, bring the yarn around the back of work and start to work next row
Rows 2-125* Knit to end, slide
(*125 is an approximate number of rows, this number could vary depending on your tension and yarn. Your finished i-cord stem should be approximately 40cm long)
Row 126 Cast off
Disc (flower centre): Make one
Using 3mm knitting needles (circular or straight) and centre colour, cast on 4sts
Row 1 Inc into each stitch KW (8sts)
Row 2 Purl
Row 3 Inc into first stitch KW, K to last stitch, inc into last stitch KW (10sts)
Row 4 Purl
Row 5 Inc into first stitch KW, K to last stitch, inc into last stitch KW (12sts)
Rows 6-10 Stocking stitch starting with a Purl row
Row 11 K2Tog, K to last 2sts, K2Tog (10sts)
Row 12 Purl
Row 13 K2Tog, K to last 2sts, K2Tog (8sts)
Row 14 Purl
Row 15 K2Tog to end (4sts)
Row 16 Cast off PW leave a tail of yarn for gathering the outside edge in making up instructions.
Leaves: Make two
Using 3mm knitting needles (circular or straight) and stem colour, cast on 16sts
Row 1 Inc into first stitch KW, K to last stitch, inc into last stitch KW (18sts)
Row 2 Inc into first stitch KW, K to last stitch, inc into last stitch KW (20sts)
Row 3 Inc into first stitch KW, K to last stitch, inc into last stitch KW (22sts)
Row 4 Inc into first stitch KW, K to last stitch, inc into last stitch KW (24sts)
Row 5 K2Tog, K to last 2 sts, K2Tog (22sts)
Row 6 K2Tog, K to last 2 sts, K2Tog (20sts)
Row 7 K2Tog, K to last 2 sts, K2Tog (18sts)
Row 8 K2Tog, K to last 2 sts, K2Tog (16sts)
Cast off KW
MAKING UP INSTRUCTIONS:
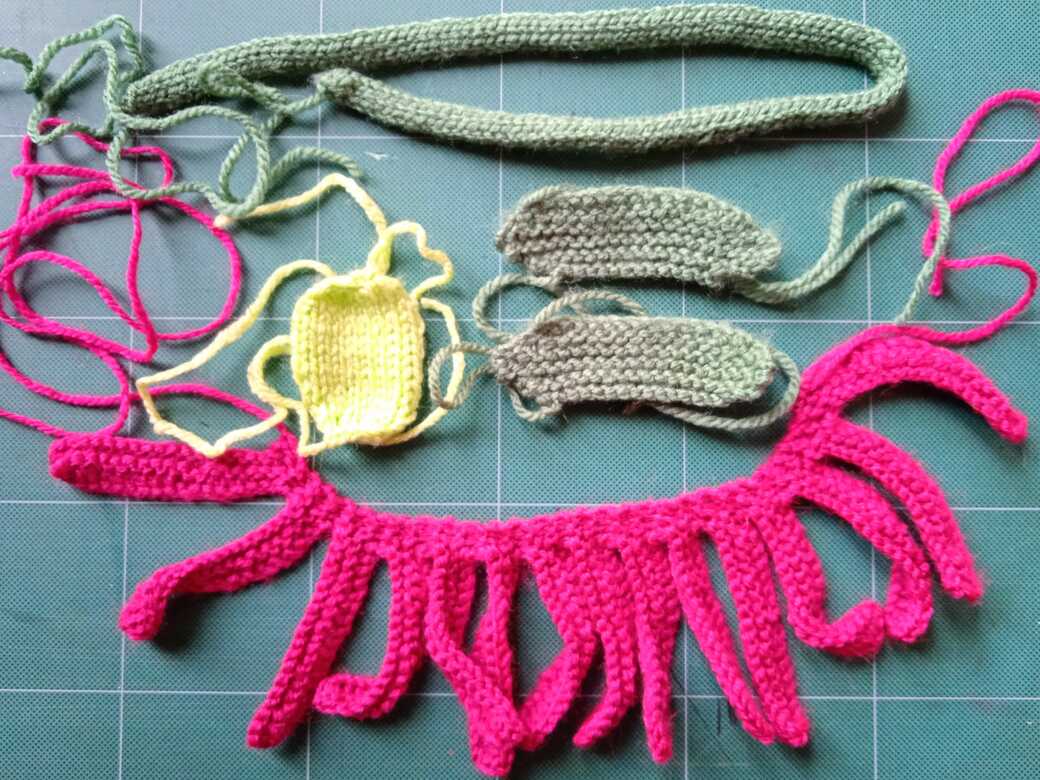
PLEASE NOTE: Four Wall Flowers were made during the writing of these instructions. The images used are the best fit for the description, therefore the same Wall Flower is not featured in all images.
PETALS:
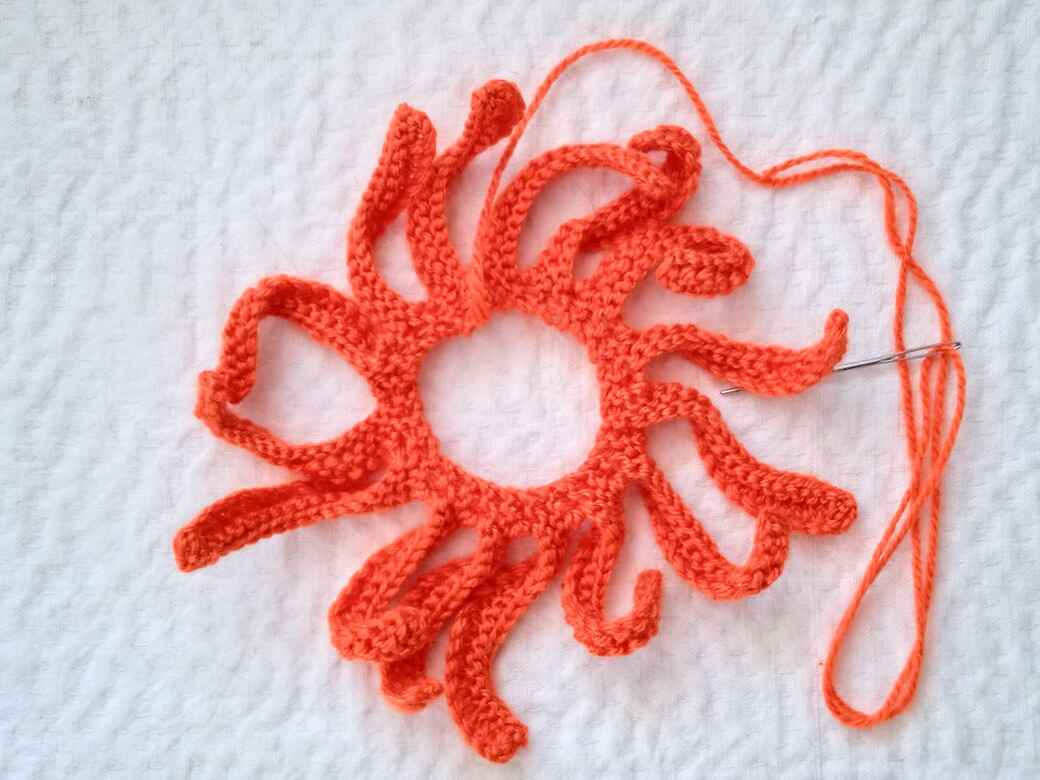
Step 1: Lay the petals out flat RS facing. You have two tails, a short one at cast on and a long one at cast off. The short tail should be on the right when the right side of the petals is facing. Fig. [a]
Step 2: Thread a tapestry/knitters needle with the short tail, bring the two ends of the 3 stitch band (centre of the petals) together and whip stitch to form a ring. Fig. [b]
ONLY STITCH THE CENTRE BAND NOT THE LENGTH OF THE PETALS.
Take care not to twist the band, secure with a few stitches and sew in the end.
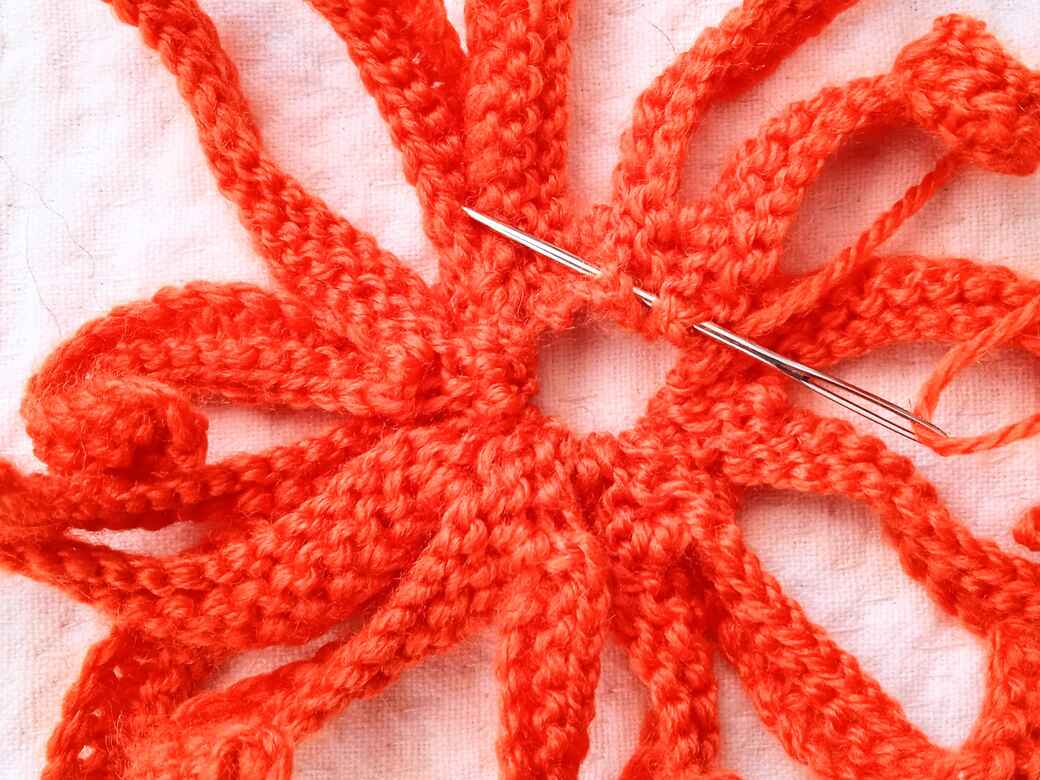
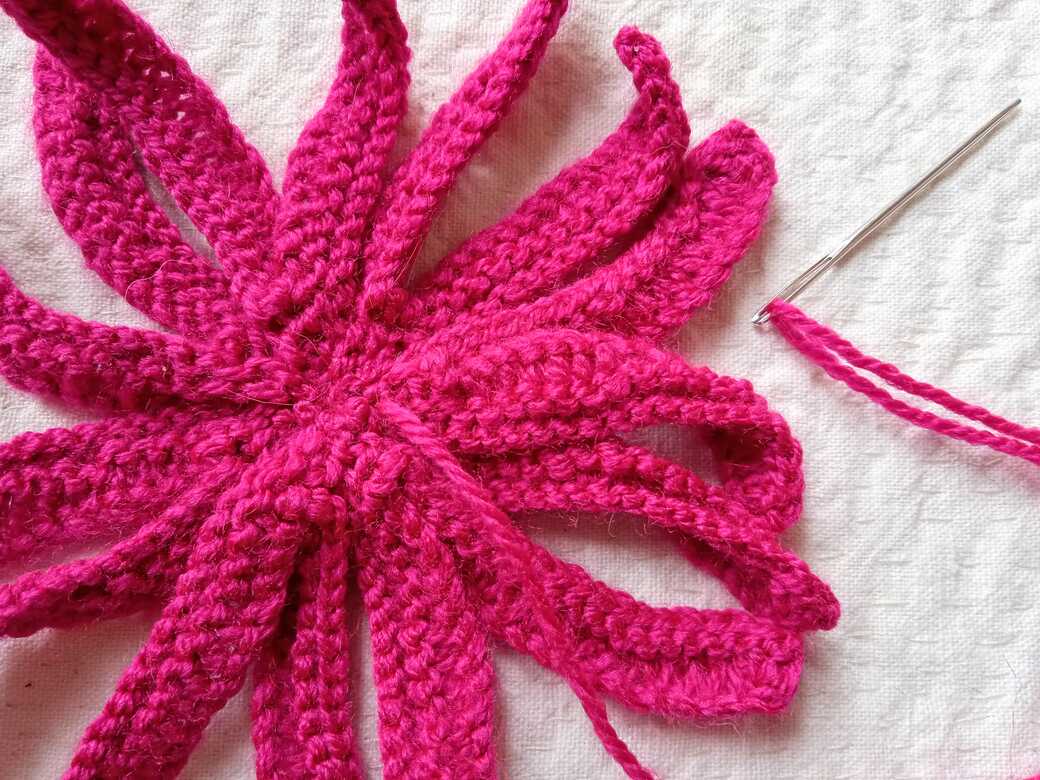
Step 3: Thread the needle with the long tail and work two rows of running stitch around the centre band, one close to the centre edge, the other a stitch further out. Gather up the stitches as you work. Fig. [c]
Step 4: Pull the stitches tight to gather the band and reduce the hole in the middle, secure the end with a few stitches. Fig. [d]
DO NOT CUT THE TAIL. Put to one side and move onto making up the flower centre.
FLOWER CENTRE:
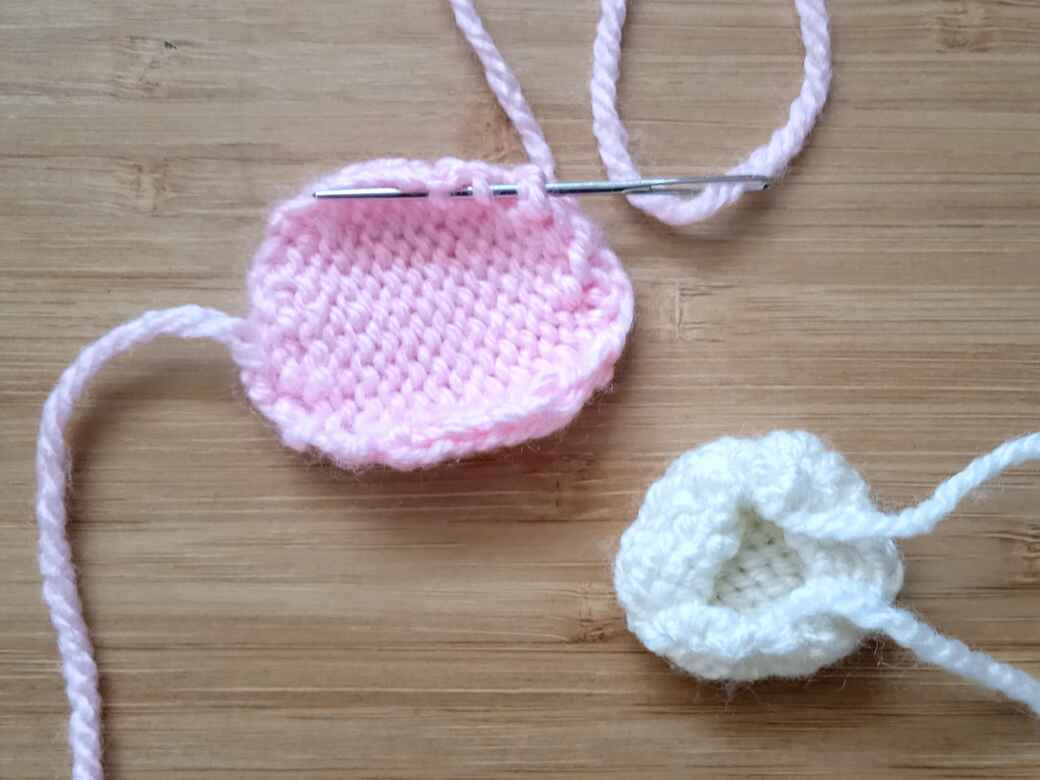
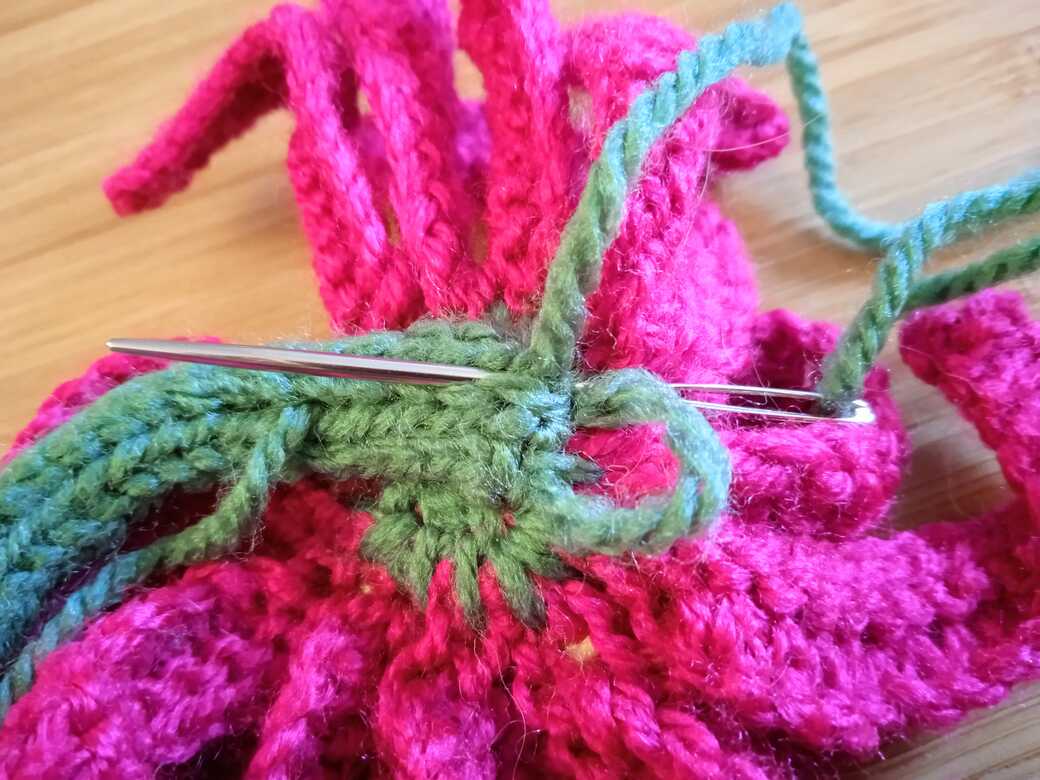
Step 1: With WS facing, thread the tapestry needle with the long cast off tail. Work around the outside of the circle using running stitch, keeping close to the edge.
Step 2: Gather up the stitches as you work but leave enough opening to add a small amount of polyester stuffing. DO NOT SECURE THE END. Fig. [e]
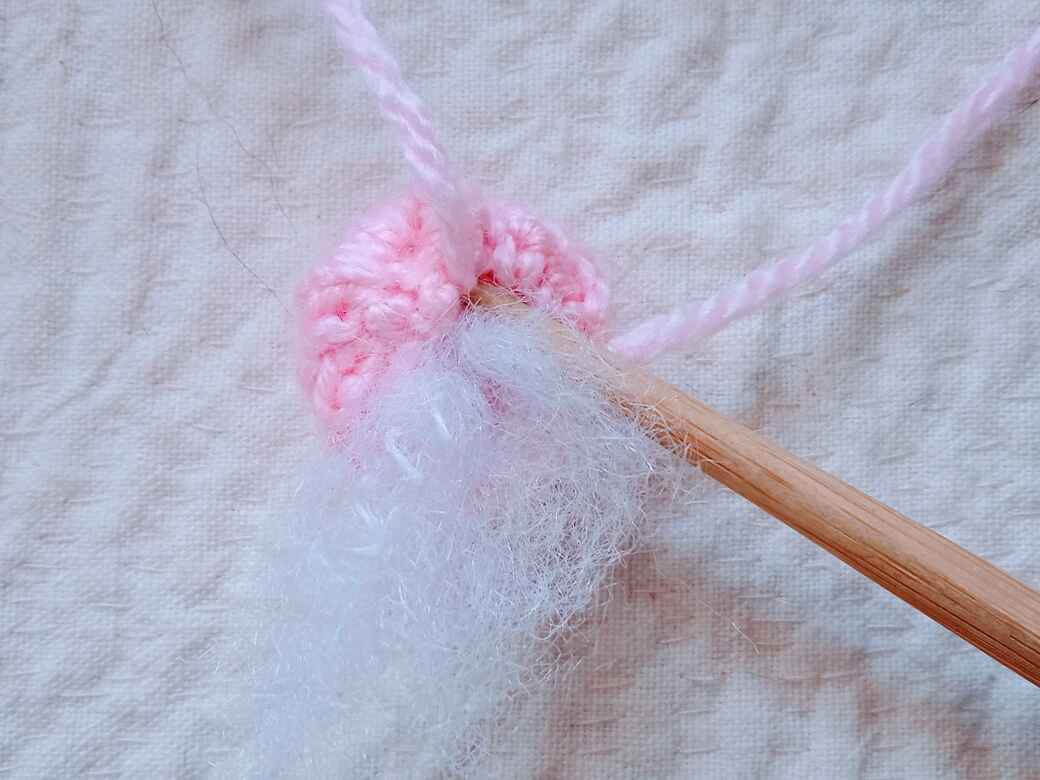
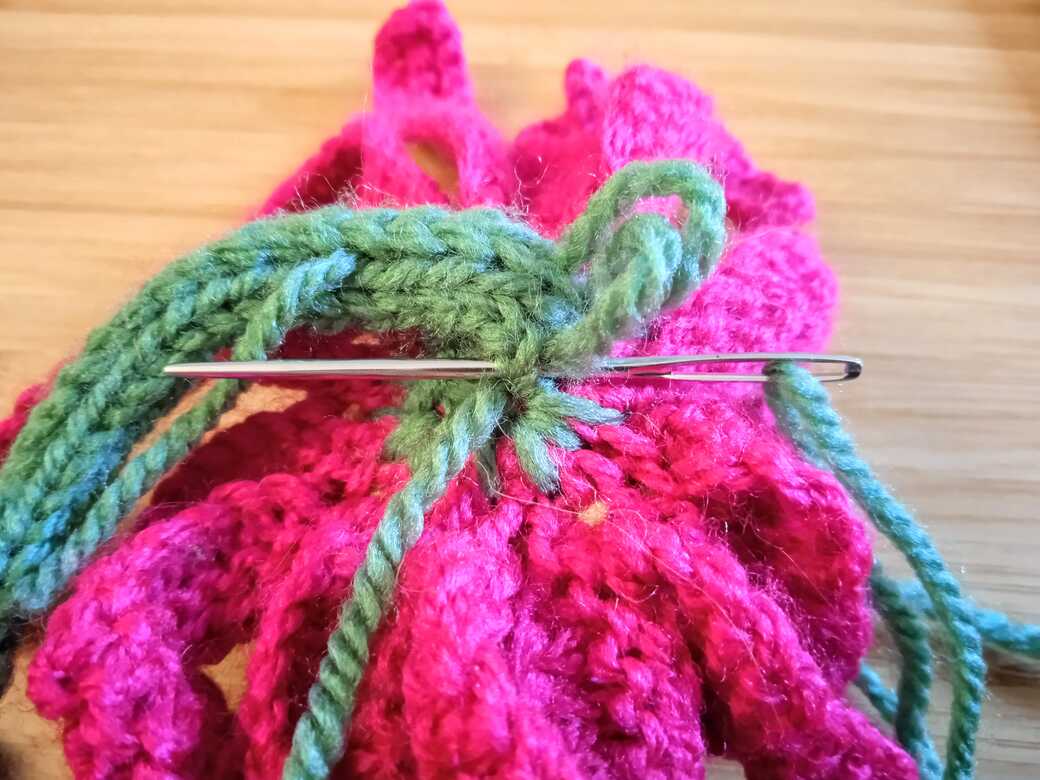
Step 3: Using a chopstick or end of a knitting needle to push a small amount of toy stuffing into the flower centre. Aim for a slightly 3D, flat round shape, a bit like a covered button (padded disc). Pull the running stitches tight to close the opening and secure with a few stitches. Fig. [f]
Step 4: Bring the needle back through the centre of the padded disc and sew approx 16 seed stitches to create texture.
NOTE: Seed stitches are random tiny stitches scattered about. Fig. [g] Fig. [h]
TO SEW THE SEED STITCHES: Bring the threaded tapestry needle up through the padded disc to the right side surface, then push the needle back down through the disc to the underside, catching a single yarn of one of the knitted stitches on the surface. Fig. [g] This creates a small seed like stitch. After sewing all 16 seed stitches finish at the underside of the disc, securing the yarn with a few stitches.
DO NOT CUT THE TAIL. Fig. [h]


ATTACH FLOWER CENTRE TO PETALS:
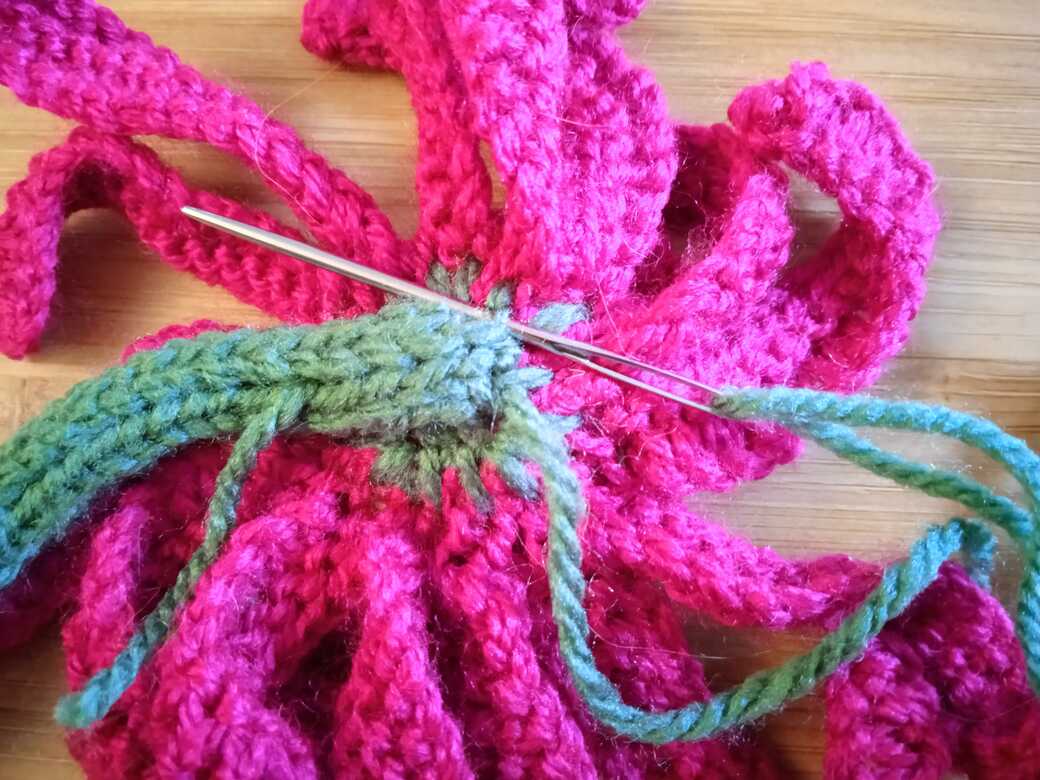
Step 1: Thread the tapestry needle with one of the centre tail ends. Hold the padded disc in position central to the petal circle RSF, over the gathered 3 stitch band. Add a few pins to keep in place.
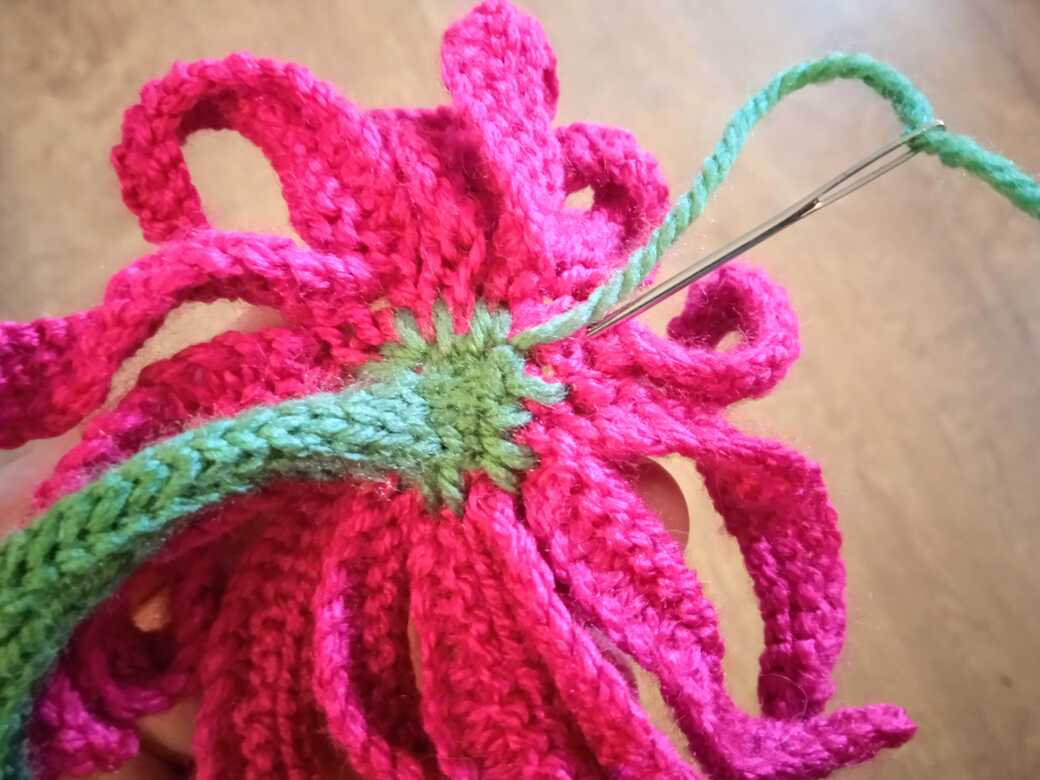
Step 2: Stitch the flower centre to the flower petals by making alternate stitches between the underside edge of the disc and the petal band. Fig. [i] Work around the padded disc until you have stitched all around the edge securing the centre to the petals. Fig. [h] (Pink flower)
Step 3: Bring needle through to the back of the flower and secure the yarn with a few stitches. Bring all yarn ends through to the back of the flower and secure with a couple of stitches. Lose the ends in the back of the flower and cut yarn. Fig. [j]

ATTACH STEM:
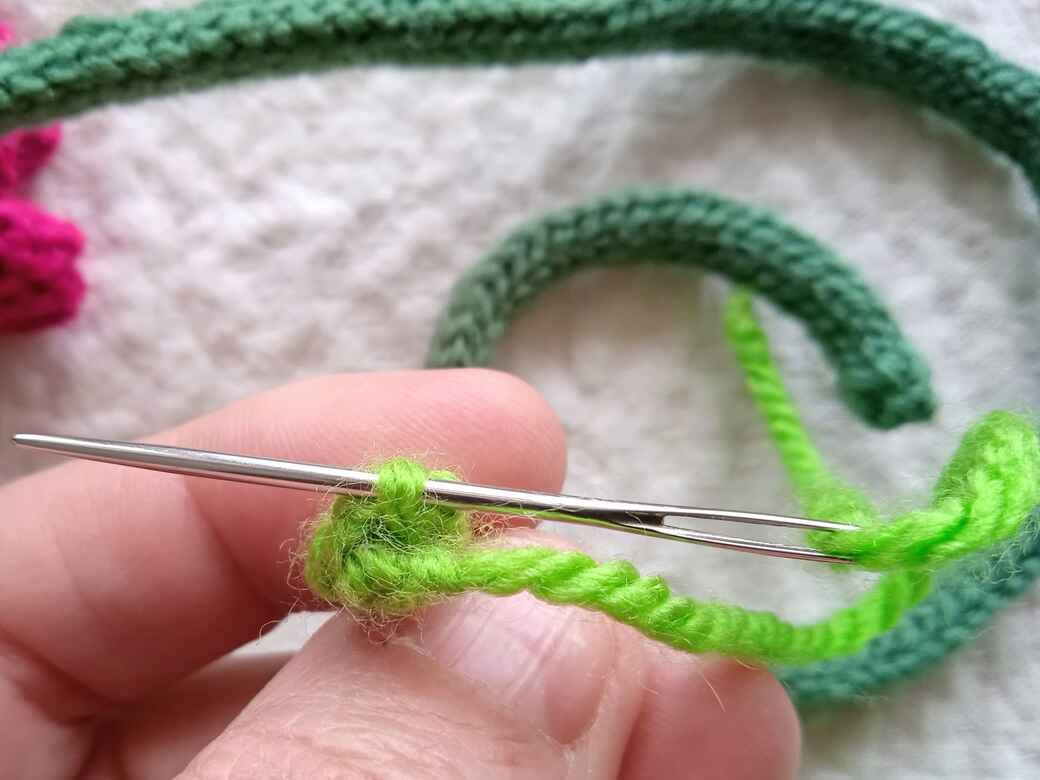
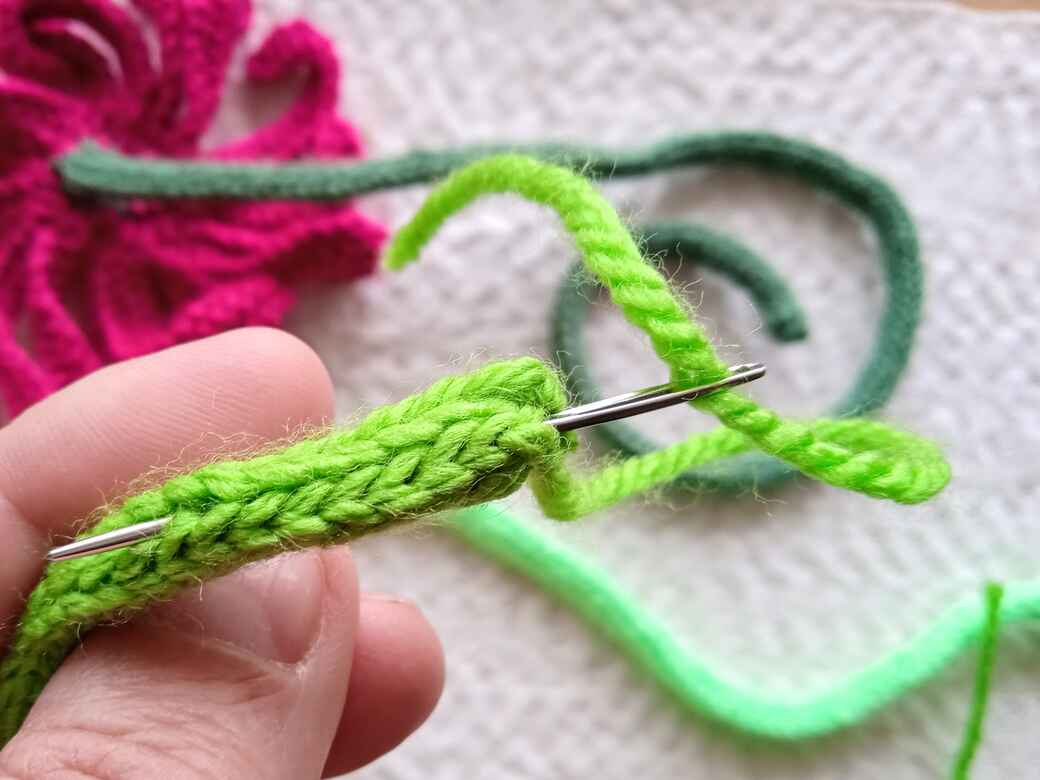
Step 1: Neaten the cast on end of the stem. Thread a tapestry needle with the cast on tail, sew a couple of stitches to neaten and close the end of the i-cord and secure with a couple more stitches. Fig. [k]
Step 2: Insert the needle back into the end of the stem, where the yarn is still attached and bring the needle up inside the stem and back out about 3cms up. Cut off yarn close to the stem. Fig. [l]
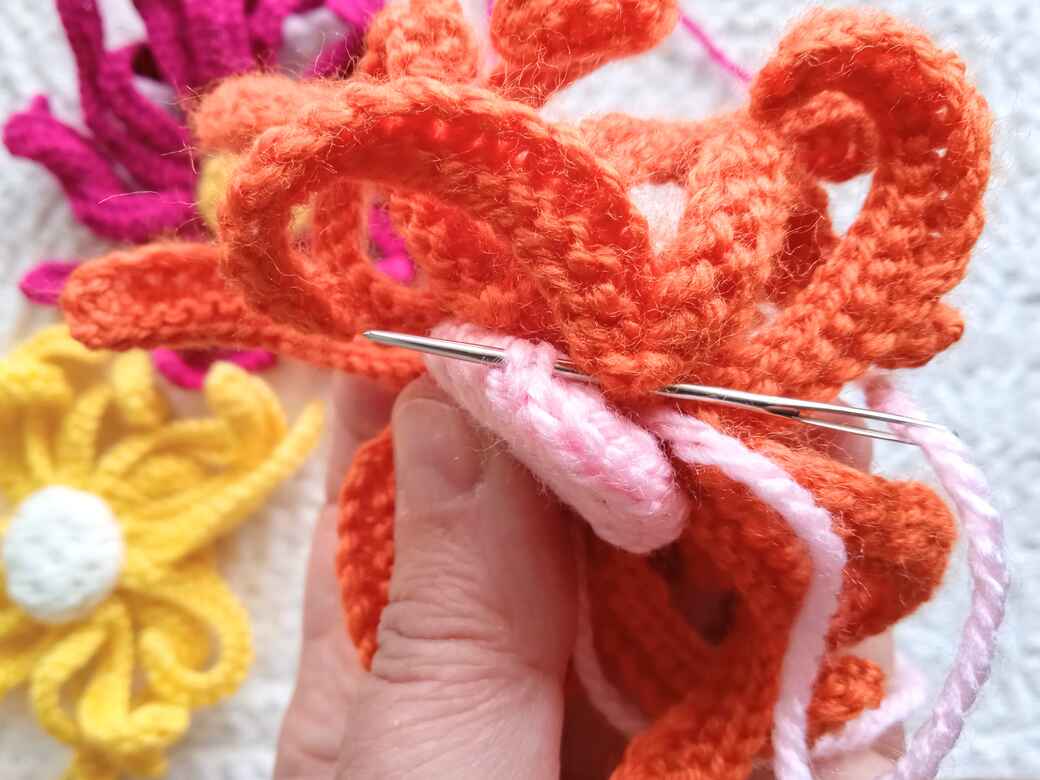
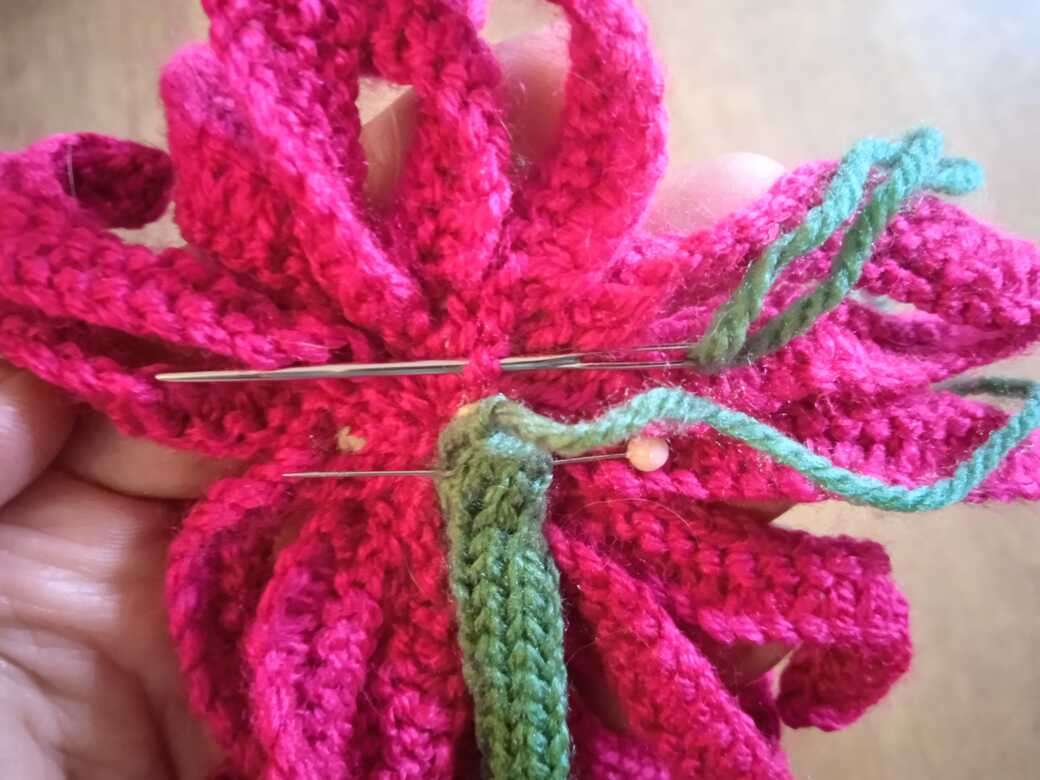
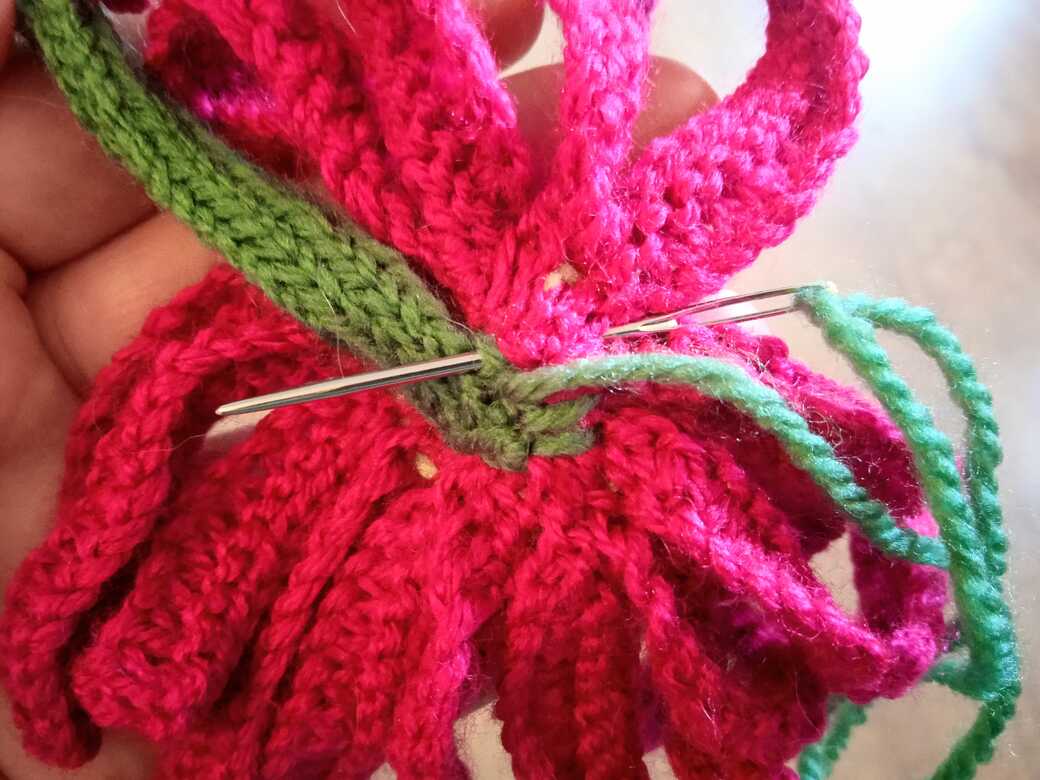
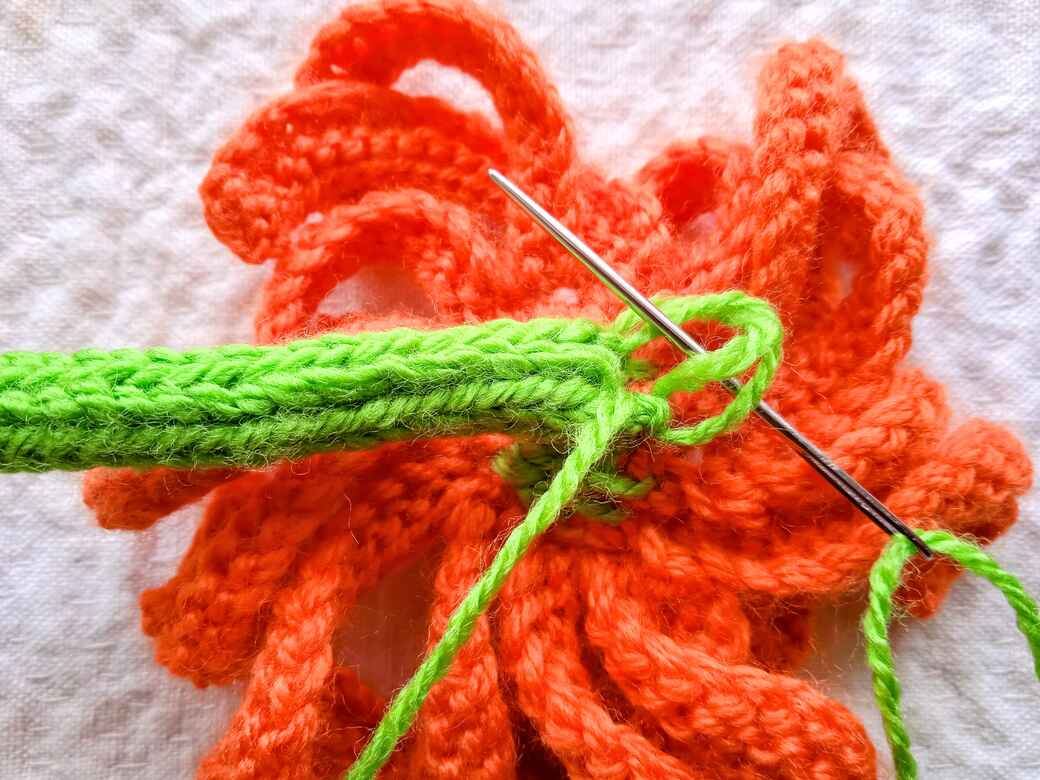
Step 3: At the cast off end, thread the tapestry needle with the tail. Position the cast off end of the stem over the centre back of the petals and secure it with a pin. Stitch the stem in place by alternating stitches between the stem and the back of the petals. Work around the edge of the stem until it is firmly attached. Similar to attaching the flower centre. Fig. [m]
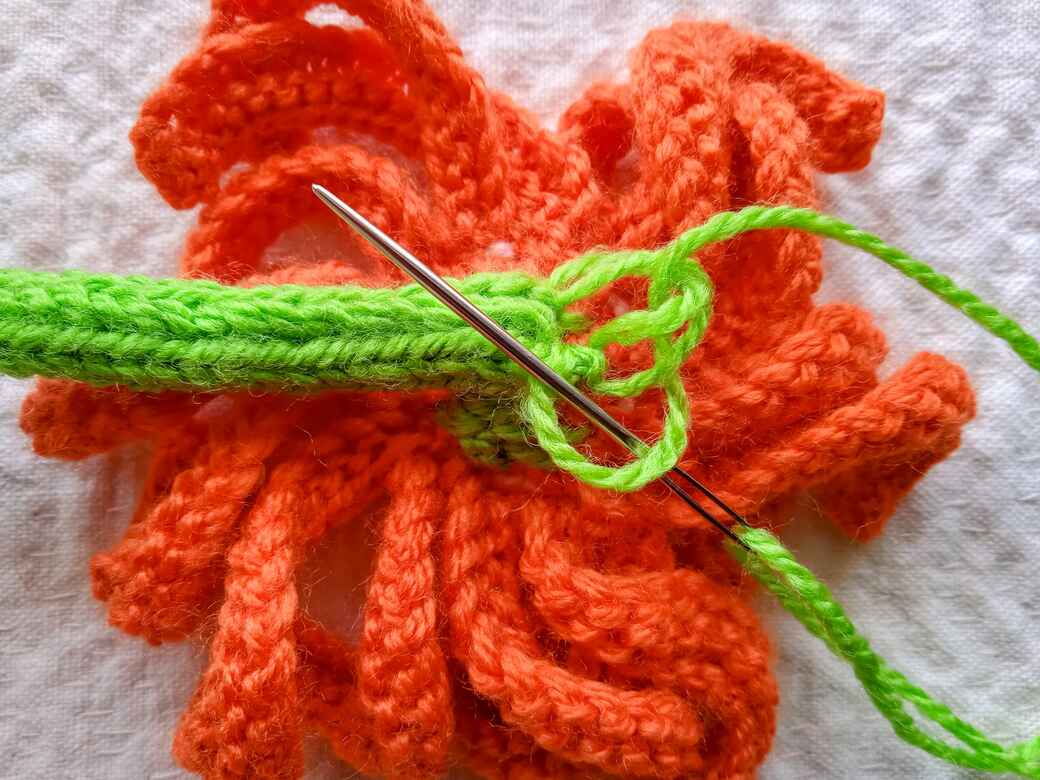
Step 4: Where the stem joins the back of the petals I like to add some embroidery stitches to create a more realistic look. These stitches are longer stitches (5-10mm long) worked from the join outwards similar to bicycle spokes. Fig.[n] [o] [p]
Work around the join leaving 1-2 mm between the stitches. Secure the yarn with a couple of stitches and insert the needle back into the stem bringing the needle out a few cms down the stem. Cut off the yarn tail. Fig. [o]
ATTACH LEAVES:
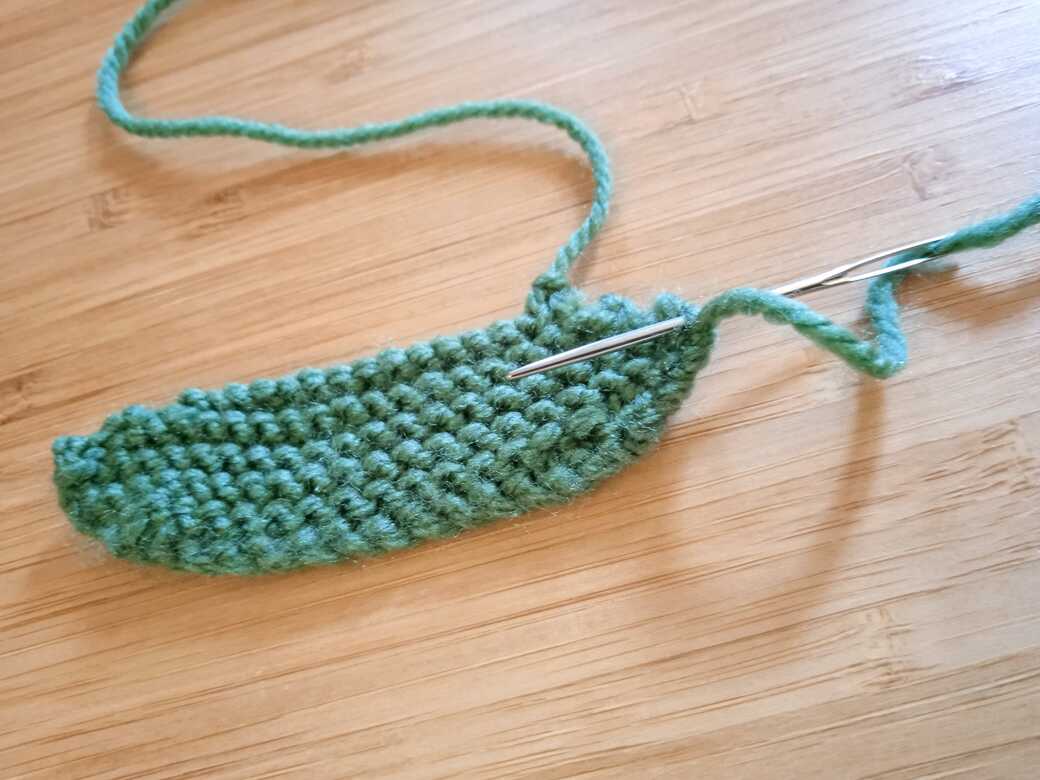
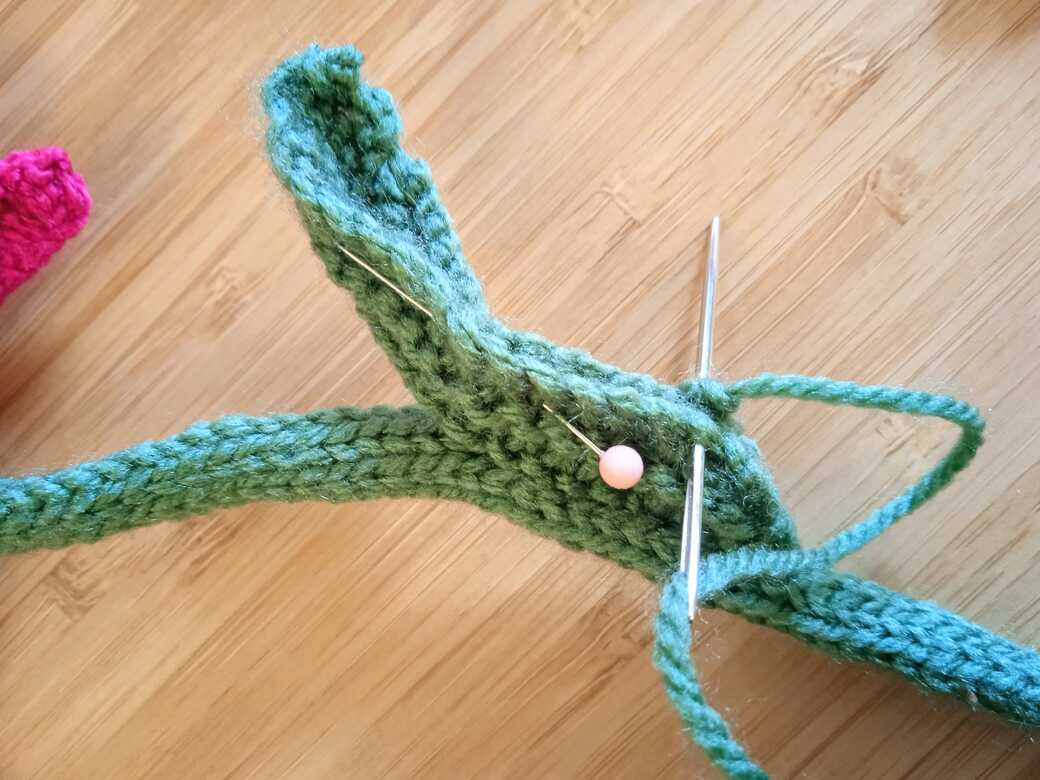
Step 1: Take one leaf and thread the tapestry needle with the cast on tail. Sew a few stitches along the edge of the leaf to position the yarn at the bottom center point of the leaf. You can use whip stitch (over the edge) or running stitch (along the edge). Fig. [q]
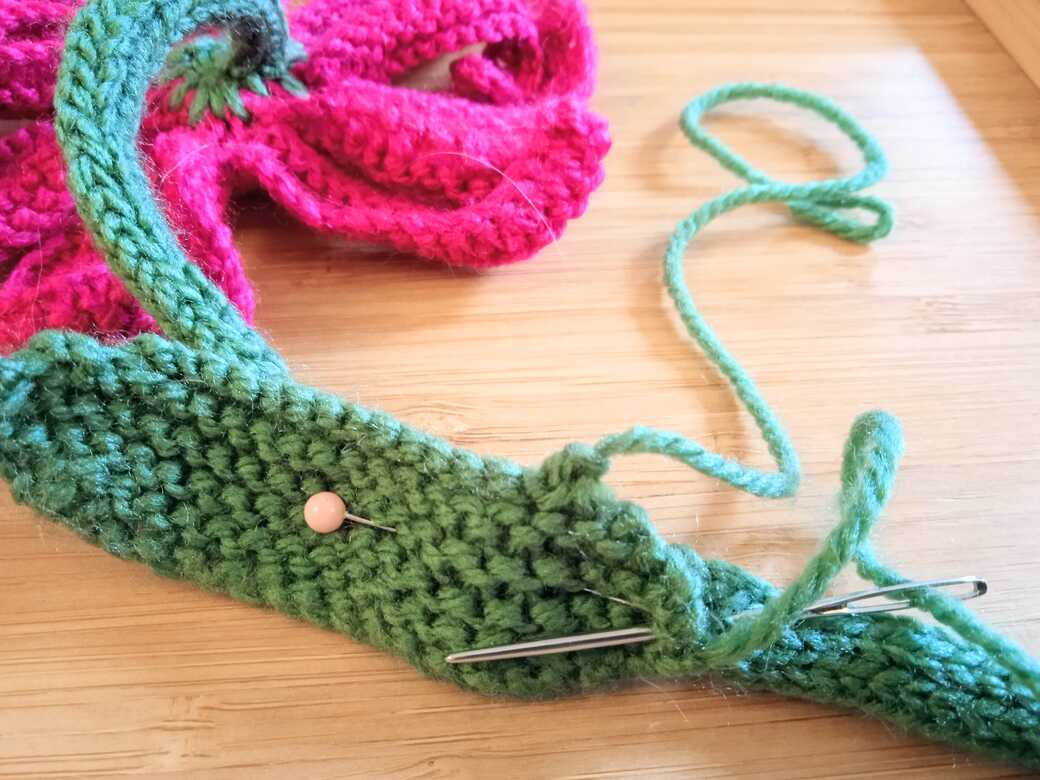
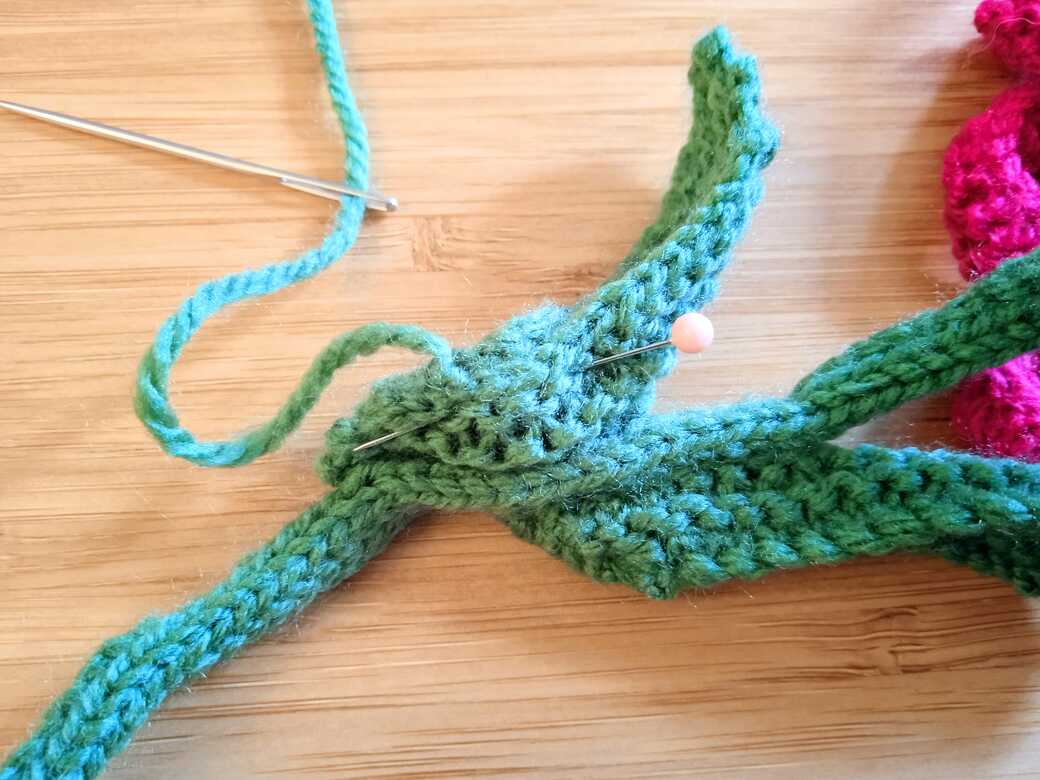
Step 2: Position the leaf on the stem and secure it with a pin. Use the main picture as a reference. Work a few running or back stitches along the centre of the leaf, passing the needle through the leaf and the side of the stem to attach the leaf. Fig. [r]
ONLY STITCH HALF WAY UP THE LEAF, LEAVE THE TOP HALF UNATTACHED.
Secure the yarn with a couple of stitches and lose the end in the stem. Cut the yarn tail close to the stem.
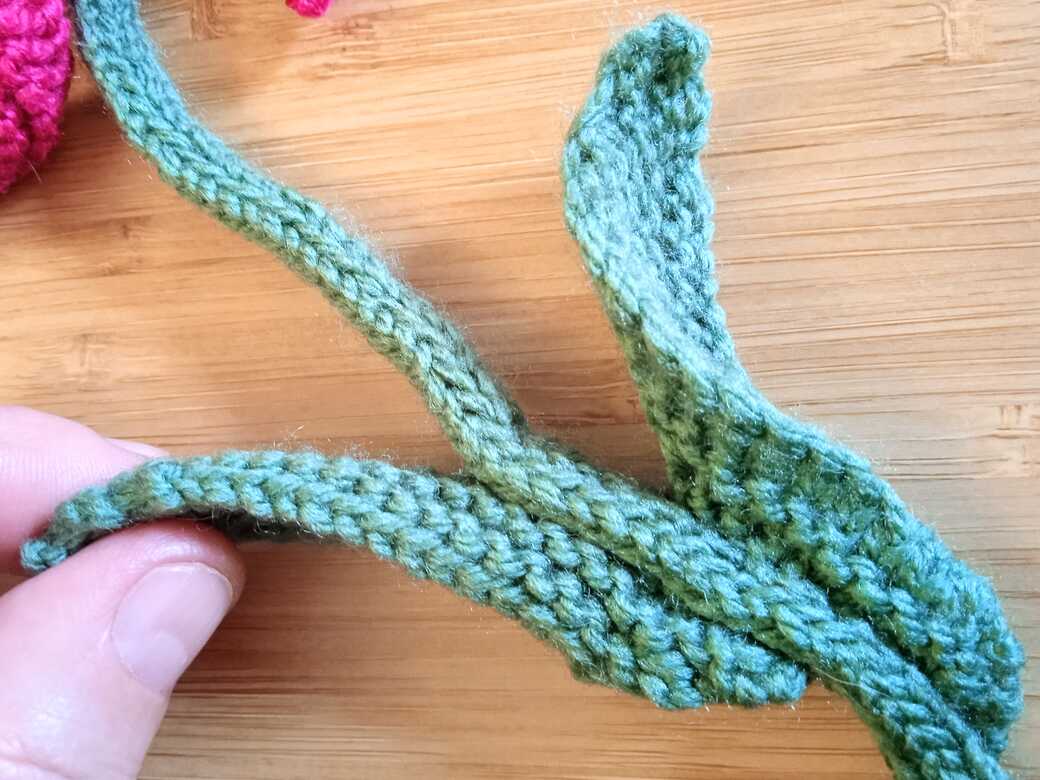
Step 3: Fold the leaf in half along its length with the edges away from the stem. Pin the two long sides of the leaf together (they should run parallel with the stem). Thread the tapestry needle with the cast off tail and whip stitch the bottom 15mm of the leaf edges together. Secure with a couple of stitches and lose the end of the yarn in the stem. Cut off the yarn tail. Fig. [s]
Step 4: Repeat ‘attach leaves steps 1-3’ with the second leaf on the opposite side of the stem. Offset the second leaf positioning it a little lower than the first. Fig. [t] Please see the main image for reference.

Step 5: Using your thumb and forefinger, gently stretch and mould each leaf for a realistic curve and twist. Again use the main image for reference.
WALL HANGING LOOP:
Step 1: Use a length of matching yarn 40-50cm. Thread the tapestry needle. Secure the yarn at the back of the flower petals where the stem joins.
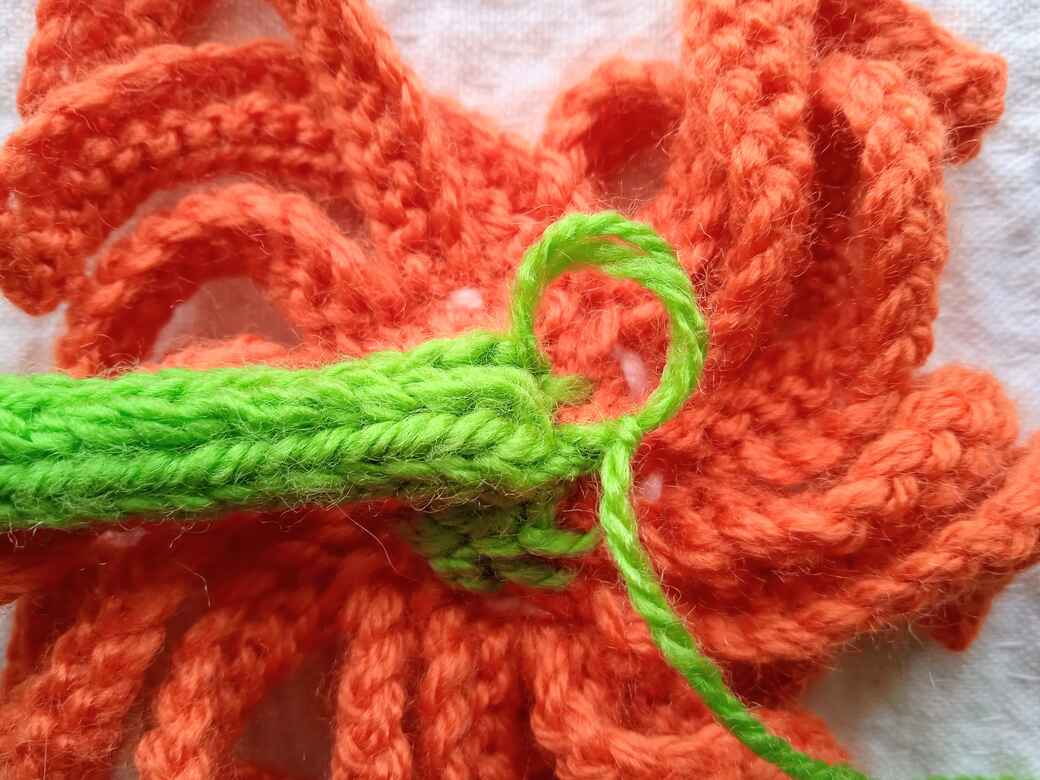
Step 2: Create a hanging loop by bringing the needle out at the upper right of the join and then making a small stitch at the upper left of the join. Fig. [w]
DO NOT PULL THE YARN TIGHT, LEAVE IT LOOSE TO CREATE A SMALL LOOP.
Sew another small stitch in the same place to secure the loop. Fig. [x]
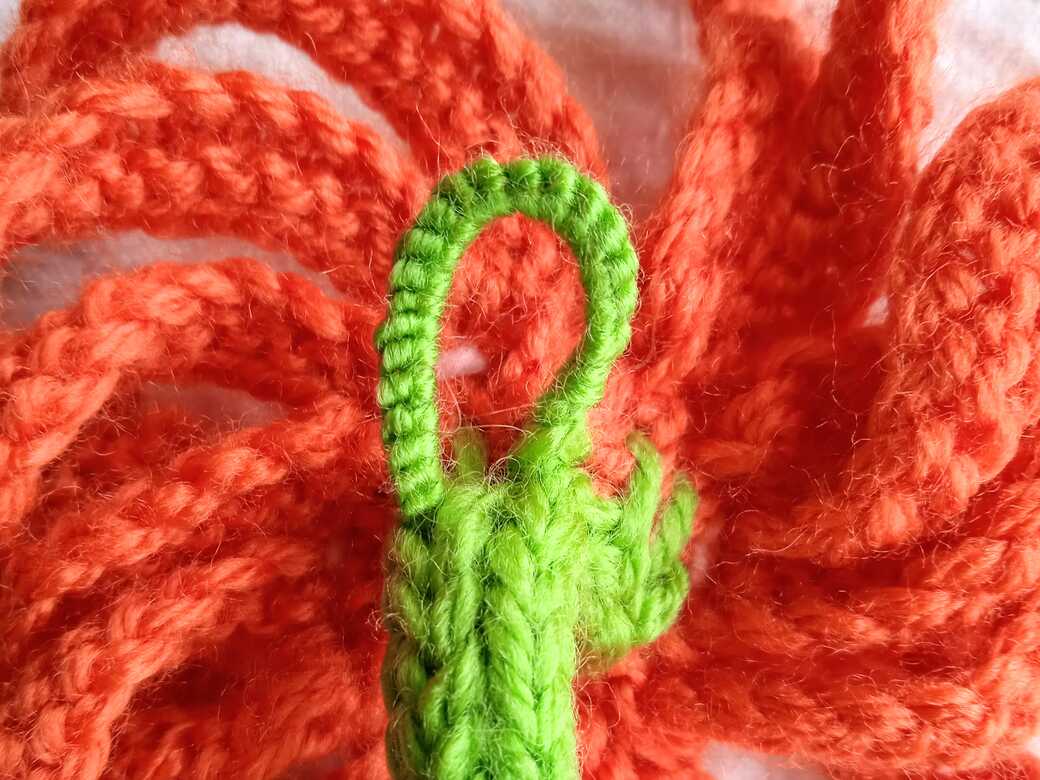
Step 3: Create a second loop by making a stitch back at the upper right of the join. Again leave the yarn loose the same as before and secure with a small stitch. Fig. [y]
Step 4: Pass the needle through the two loops from right to left creating a new loop. Fig. [z] DO NOT PULL TIGHT.
Step 5: Bring the needle back around to the right and pass it through the new loop that you have just made. Fig. [A]
Step 6: Pull the yarn tight creating a knot and push it down to the base of the loop at the right hand side. Fig. [B]
Step 7: Repeat steps 4-6 positioning each new knot on top of the last. Fig. [C] Until you have filled in the length of the loop. Fig. [D]
Step 8: Secure the yarn at the base with a couple of small stitches and lose the yarn in the back of the flower.

SAFETY NOTE
Not suitable for children under 3 years of age.
This design includes small parts.
Small parts can present a choking hazard for young children.
Please take extra care if giving ‘Wall Flower’ to a child to make sure it is age appropriate.
Please see website TERMS & CONDITIONS for full details.
I have vigorously self-tested this pattern to check for errors. However, if you notice an error in this pattern please let me know by sending a message via the contact page.
Happy knitting x
© GREEN DOG DOLLS 2025
‘Wall Flowers’ design, pattern and images remain the property of Green Dog Dolls and may be withdrawn at any time without notice.
Have you tried this project yet?
Was it easy to follow?
What other projects would you like to see?
Leave me a comment below.